Acrylic Fabrication & Machining Guide
Cutting, Machining, Thermoforming, Bonding & Finishing Acrylic
 Acrylic (PMMA), commonly referred to as plexiglass, machines cleanly, polishes to optically clear edges, and thermoforms reliably—when you control heat, stress, and chip evacuation to avoid melting and crazing. This Interstate Plastics guide offers:
- Proven shop setups for cutting, routing, drilling, and laser cutting acrylic.
- Temperature windows you can trust for line bends and oven forming.
- Quick fixes for common failures like melt-back, chipping, crazing, and webbing.
- Practical notes for edge finishing, solvent bonding, and flame polishing.
Ready to build? Use the quick-start tables below to set your speeds, feeds, and forming windows, then jump directly to the process you're running.
- At a Glance: Acrylic Fabrication Quick Settings & Setups
- Acrylic (PMMA) Material Overview: Properties, Grades, & Similar Options
- Cutting Acrylic (CNC, Saw, Laser): Kerf, Feeds & Edge Quality
- Acrylic Machining & Drilling: Starter Feeds, Speeds & Chip—Load
- Machining Acrylic Rod and Tube Forms
- Edge Finishing & Polishing Acrylic: Scrape, Sand, Flame, Buff
- Painting & Printing on Acrylic
- Acrylic Bonding & Assembly
- Thermoforming Acrylic
- Acrylic Fabrication Common Problems & Fixes
- Application—Specific Acrylic Tips
- Acrylic Safety, Handling, and Storage
At a Glance: Acrylic Fabrication Quick Settings & Setups
Saw & Cutting — Quick Specs
| Item | Spec |
|---|---|
| Blade Type | Carbide, Triple-Chip Grind (TCG) |
| Hook / Rake | 0° to −5° (neutral to slight negative) |
| Clearance | ≈ 10–15° |
| Tooth Count (10″) | ≈ 80T (higher TPI than wood) |
| Chip Control | Leave masking; use air/mist to clear chips |
| Feed steadily: too slow melts, too fast chips. Keep blades sharp and support the material/workpiece. | |
Acrylic Forming Windows
| Grade | Sheet Temp (°F) |
|---|---|
| Extruded | 290–320 (some grades 270–350) |
| Cast | 340–380 |
| Cooling/Handling | Keep on mold until rigid; remove below ∼140 °F |
| *Reference the heating and forming section for brand-specific guidelines. | |
Key Tables in This Guide
- CNC Chip Load Starter Settings
- Drill Speed & Feed Guide
- Annealing Quick Reference
- Line—Bend Thickness Limits
- Brand Specific Forming Windows
Acrylic (PMMA) Material Overview: Properties, Grades, & Similar Options
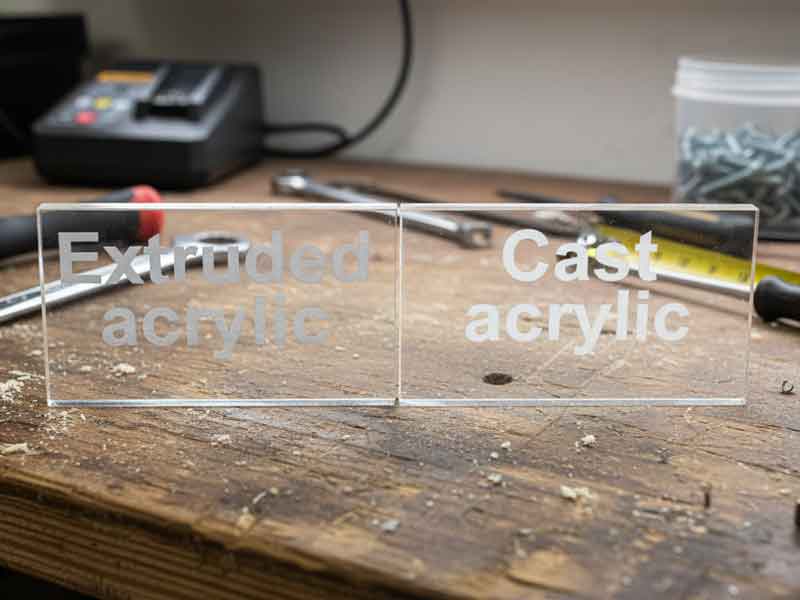
Cast vs. Extruded Acrylic
Acrylic is produced in two main forms – cast and extruded – which differ slightly in properties and fabrication behavior. Cast acrylic is made by pouring liquid monomer into molds to harden, whereas extruded acrylic is made by continuously pushing molten acrylic through a die. Key differences are summarized below.
| Property | Cast Acrylic | Extruded Acrylic |
|---|---|---|
| Clarity & Optics | Excellent optical quality (premium clarity). Available in a wide range of colors (casting process allows more custom tints). | Very good clarity (may have slight extrusion lines). Limited color range available (harder to custom tint). |
| Surface Hardness | Slightly harder surface; more scratch and chemical resistant. | A bit softer; slightly less scratch and chemical resistant. |
| Strength & Stiffness | Strong and rigid (higher molecular weight). Less prone to cracking during machining. | Lower molecular weight – somewhat less overall strength. Still stiff, but a bit more notch-sensitive. |
| Thermal Behavior | Higher forming temperature (∼340–380 °F; Tg/glass transition temperature ≈ 221 °F). Wider thermoforming window, but requires more heat/time. Resists flame polishing (flows less). | Softens at lower temp (∼300°F). Easier to thermoform (melts sooner, shorter heating). Flame polishes more easily (melts quickly for glossy edges). |
| Internal Stresses | Little to no built-in stress (sheets are polymerized in place). Thickness can vary slightly across sheet (±15–20% tolerance). | More internal stress from extrusion process (can cause slight bowing or warpage). Thickness is very consistent (±5–10% tolerance). May require annealing before critical bonding. |
| Cost & Availability | More expensive (labor-intensive batch process). Often used for high-end applications or thick sheets >1/2″. | Generally more affordable; produced in high volumes. Common for general-purpose projects due to lower cost. |
Relevant Properties for Machining Acrylic
| Property | Cast Acrylic | Extruded Acrylic | Units |
|---|---|---|---|
| Glass transition temperature (Tg) | 105 C / 221 F | 105 C / 221 F | C / F |
| Heat deflection temp @ 264 psi | 95 C / 203 F | 95 C / 203 F | C / F |
| Tensile modulus (E) | 3.1–3.3 (450–480) | 2.9–3.2 (420–465) | GPa (ksi) |
| Tensile strength | 65–75 (9–11) | 55–70 (8–10) | MPa (ksi) |
| Elongation at break | 4–6 | 2–4 | % |
| Rockwell hardness | M-95 | M-95 | M scale |
| Notched Izod impact | 0.3–0.4 (16–21) | 0.3–0.5 (16–27) | ft-lb/in (J/m) |
| Coefficient of thermal expansion (CTE) | 70 ppm/°C (0.000039 in/in-°F) | 70 ppm/°C (0.000039 in/in-°F) | ppm/°C (in/in-°F) |
| Thermal conductivity | 0.19–0.20 (0.11–0.12) | 0.19–0.20 (0.11–0.12) | W/m-K (BTU/hr·ft·F) |
| Moisture absorption, 24 h | 0.2–0.4 | 0.2–0.4 | % |
| *Representative values; verify against the specific datasheet when tolerances are critical. Values are typical for clear, unfilled PMMA. | |||
Other Clear Plastics: Acrylic vs. Polycarbonate vs. PETG
Acrylic isn't the only clear thermoplastic; polycarbonate and PETG are two common alternatives. Each material has its niche, so consider the requirements of your application:
Acrylic vs. Polycarbonate (PC)
- PC is ∼30× stronger than acrylic (virtually unbreakable) and tolerates higher temperatures than acrylic.
- PC is a go-to for impact-resistant safety shields, machine guards, and vandal-resistant glazing; also used for bullet-resistant windows and riot shields.
- PC scratches more easily than acrylic and may yellow with long UV exposure unless coated, whereas acrylic offers better UV stability.
- PC is less forgiving to solvent bonding; use specialty solvents/adhesives and manage stress carefully.
- PC machines easily due to its ductility. PC must be dried before thermoforming and has a narrower forming window.
- Expect more finishing with PC to maintain optical clarity compared to acrylic's display-quality clarity.
Acrylic vs. PETG
- PETG is more impact resistant than acrylic (∼3×) but is less stiff than acrylic and not as strong as PC.
- PETG is easier to thermoform than acrylic or PC; it heats and forms at lower temperatures with shorter cycles.
- PETG is FDA compliant for food contact in standard grades and is common for vending machine fronts and medical device enclosures.
- PETG can be sawed, laser-cut, and bent like acrylic; it resists cracking during machining.
- PETG is not UV-stable and will haze or discolor outdoors, unlike acrylic.
- PETG edges don't polish to acrylic's crystal clarity; flame polishing can cause whitish bloom or burns.
Summary
- Choose acrylic for display-quality clarity, high rigidity, and UV stability at a cost-effective price.
- Choose polycarbonate over acrylic for extreme impact or higher-heat applications.
- Choose PETG over acrylic for quick thermoforming of durable indoor parts.
Cutting Acrylic (CNC, Saw, Laser): Kerf, Feeds & Edge Quality
Cutting is often the first step in fabrication. Acrylic can be cut with a variety of tools, from simple hand—scoring to power saws, lasers, and CNC routers. The best method depends on the sheet thickness, desired cut quality, and complexity of the shape.
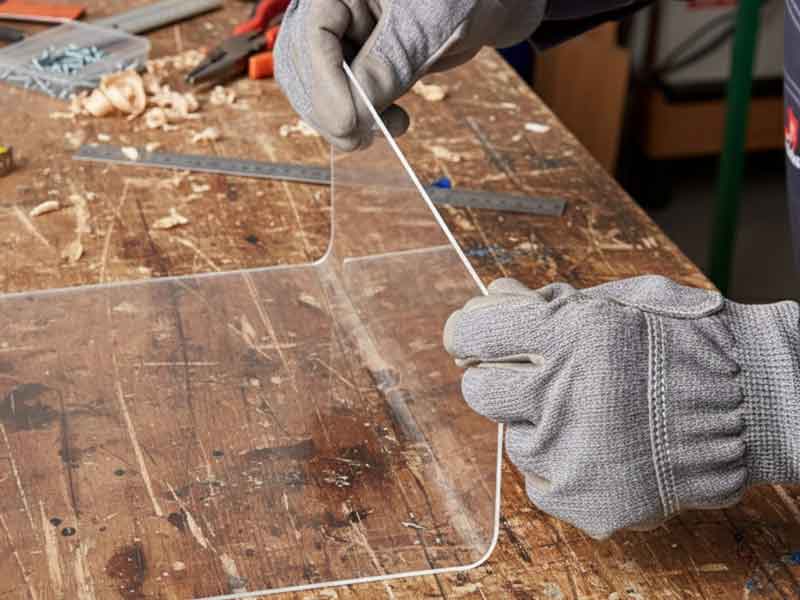
Scribing & Breaking (Score—and—Snap)
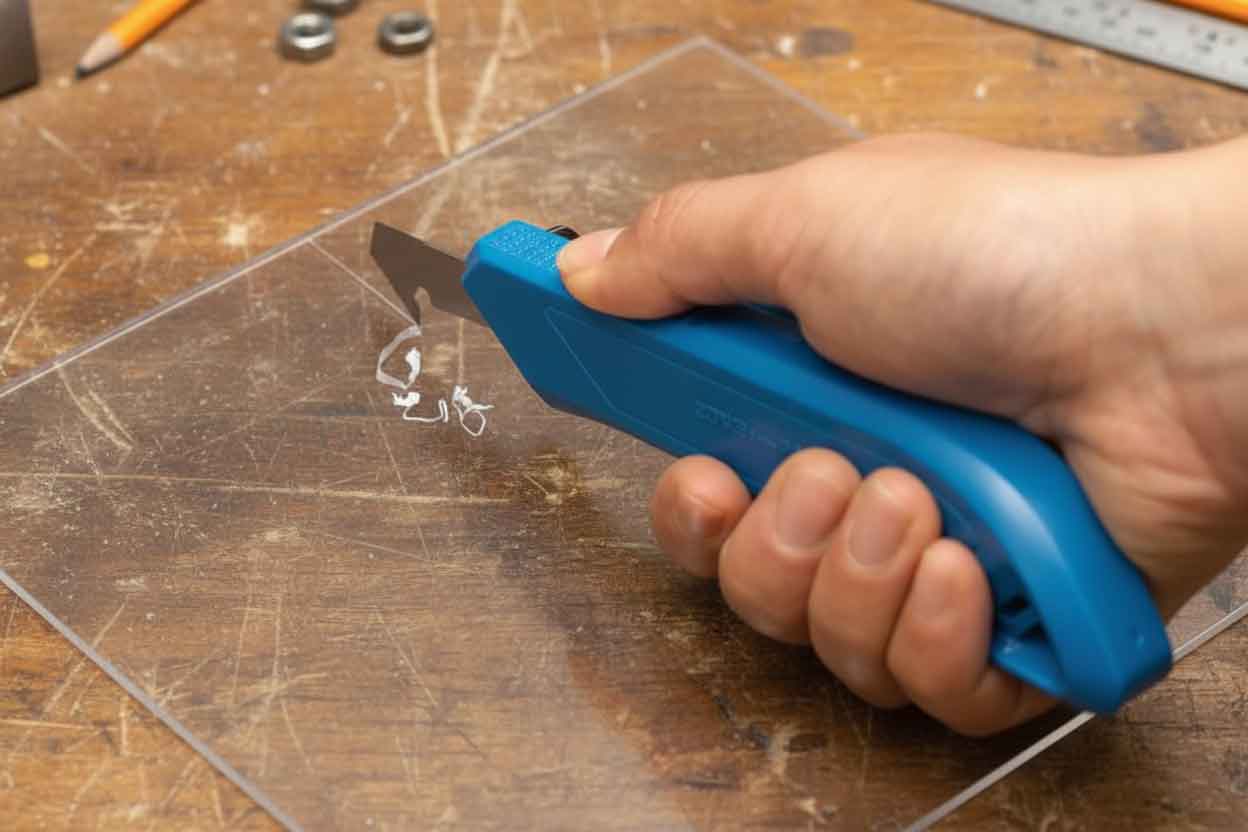 For straight cuts on thin acrylic sheet (up to ∼1/8″–1/4″ thick), the simplest method is scribing with a scoring knife and breaking the sheet. Using a sharp plastic scoring tool (or a utility knife with a special acrylic blade), score a straight groove along the cut line, making multiple passes with firm pressure. Aim to cut roughly one-third of the way through the sheet. Then align the scored line with the edge of a table and snap the piece off with gentle, even pressure. Tips: Clamp a straightedge guide to keep your score line true, and score both sides of sheets thicker than 1/8″ for a cleaner break. Support the smaller side of the piece as you apply pressure to prevent splintering. Scribing is a quick way to obtain rough-cut sizes, but the edge will be jagged. Plan to saw, route, or sand the edge afterward if a smooth finish or tight tolerance is required.
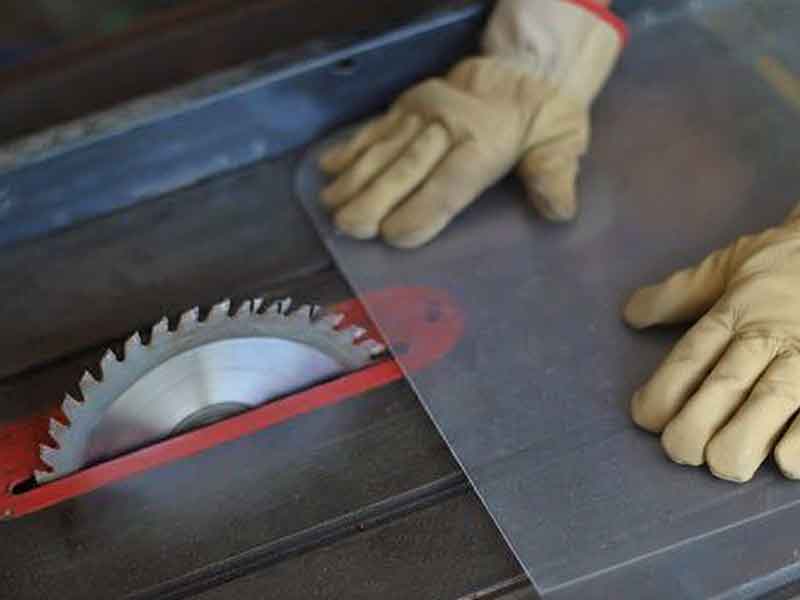
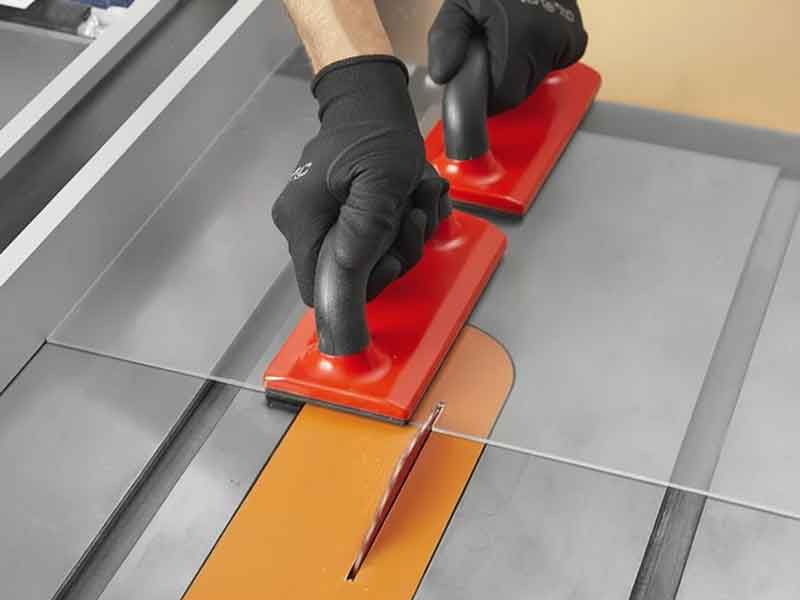
Power Saw Cutting (Table Saws, Panel Saws, Miter Saws)
 For high—volume straight cuts or thicker sheets, power saws are the workhorse. Standard woodworking saws can cut acrylic, but selecting the right blade is crucial for achieving a smooth, melt-free edge. Use a carbide-tipped blade designed for plastics or acrylic. These typically have a triple-chip grind and a neutral or slightly negative rake angle to produce a scraping cut rather than a grabbing cut. A typical specification is ∼80 teeth on a 10″ diameter circular saw blade (higher tooth counts and smaller gullets than wood blades), with 0° to −5° rake and ∼10–15° clearance angle. Such blades cut acrylic cleanly with minimal chipping. Ensure the blade is sharp — a dull blade will overheat and chip the material.
When cutting, set the blade height such that it protrudes about 1/4″ above the sheet (this reduces edge chipping on the exit side). Feed the acrylic slowly and steadily. Too slow can cause melting, too fast can cause cracking or flying chips. It helps to leave the protective film on during cutting to reduce chip—out. Support the sheet firmly to minimize vibration. Table saws and panel saws excel at straight cuts: you can even stack multiple sheets to cut several at once, as long as the saw can handle the thickness. For angle or miter cuts, a power miter saw with an acrylic blade can be used on smaller pieces, again feeding slowly. Always use a blade guard and eye protection; acrylic chips can be sharp and may eject at high speed.
With the right blade and setup, saw—cut acrylic will have a clean edge that requires only minimal deburring. However, fine finishing (polishing) may require additional steps (covered later in this guide). Avoid using high—speed steel blades not meant for plastic, as they heat up quickly. If you notice melting or gumming on the blade, pause to allow things to cool, or try increasing the feed rate slightly.
Pro Tip: You can apply water or a dilute coolant as a mist when sawing acrylic to help keep the blade cool and clear chips, but make sure it's a plastic—compatible coolant (plain water works for simple cuts). Often, just a stream of compressed air aimed at the blade will help clear chips and reduce heat buildup.
Curve Cutting (Band Saws, Jig Saws)
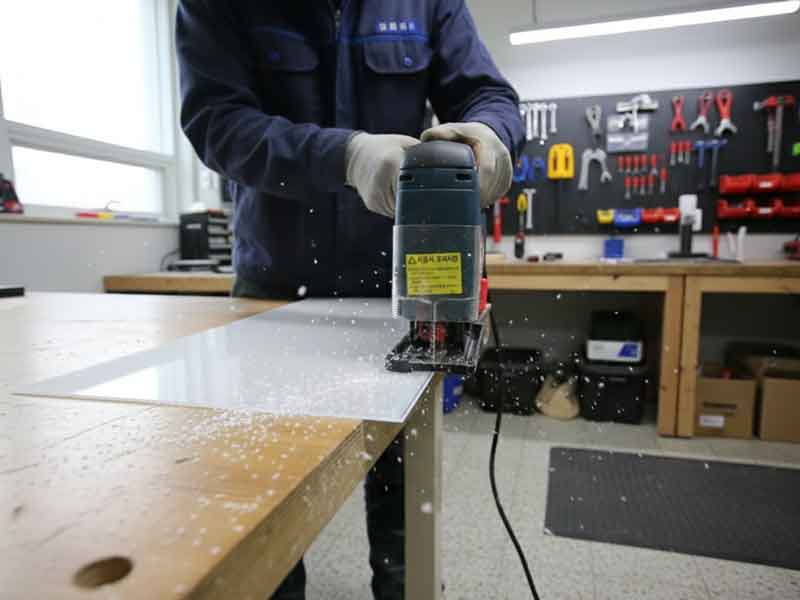 For curved cuts, irregular shapes, and interior cut—outs, you have a few options: band saws, scroll saws, or saber saws (jig saws).
- Band Saw: Use a fine—tooth blade (e.g., 10–14 TPI) and relatively slow blade speed if adjustable. A band saw is great for smoothly cutting gentle curves or trimming shapes out of larger pieces. Ensure the saw's table is sturdy and use steady feed pressure. Blade drift can be an issue on thick acrylic, so a sharper blade and slower feed help. The cut edge from a band saw will be rougher than a table saw. Leave some allowance and plan to rout or sand to final line if precision is needed.
- Scroll Saw or Jig Saw: For intricate small cuts or interior cutouts, a scroll saw works well on thinner sheets. Use a very fine blade and support the work to avoid cracking. A hand—held jigsaw can cut acrylic too, but it tends to vibrate and chip the material unless you use a high—quality blade made for plastics. Choose a slow speed setting and a blade with ground, downward—facing teeth (to prevent lifting the sheet). Always clamp the acrylic sheet near the cut line to minimize chatter. Apply masking tape on the cut line to reduce chipping and help guide your cut. For tight-radius cuts, drilling a relief hole at the corner can help the blade turn smoothly without binding.
Band, scroll, and saber saws are best for non—straight cuts and can produce complex shapes that would be difficult to score—and—snap or table—saw. Keep the saw blades cool. If you see melted chips re—fusing on the edges, it means the blade or feed rate is too hot. Try to maintain a continuous motion. If needed, stop and clear melted chips from the blade teeth before continuing.
Acrylic CNC Routing and Milling: Setup & Techniques
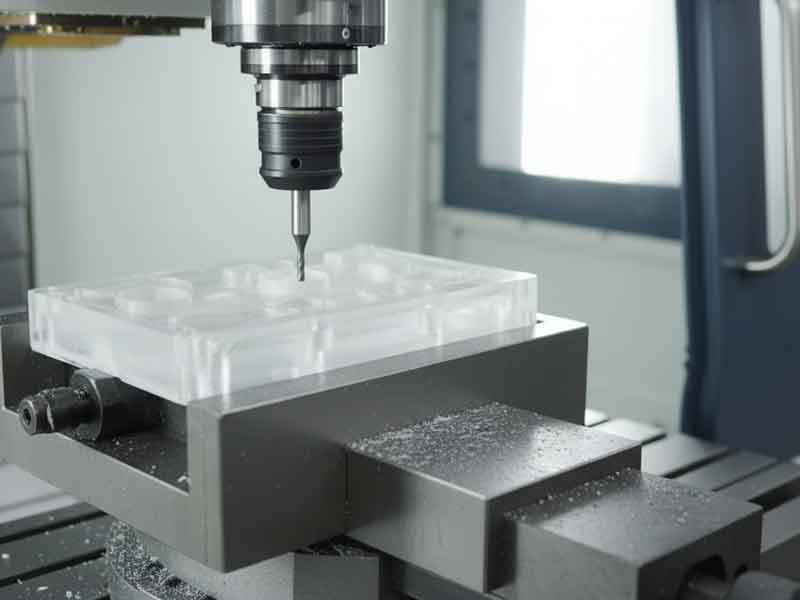 CNC routers and mills are excellent for cutting precise shapes, holes, and profiles out of acrylic, especially for repetitive or complex designs. A CNC router can produce smooth edges and intricate shapes that might be impossible by hand.
Tooling: Use sharp single-flute or two-flute cutters designed for plastic. An O-flute (high positive rake, large chip cavity, polished cutting edge) is preferred in acrylic for chip evacuation and to reduce heat. Carbide is recommended for life and edge quality. Use positive rake with adequate clearance (5–10 deg). Avoid neutral or negative rake in acrylic, as it can rub and overheat. For CNC, solid-carbide up-spiral O-flutes (1–3 flute) are the dependable default. Dull tools or poor geometry cause chatter, heat, and poor edge quality.
Workholding and Vibration: Secure the acrylic sheet firmly (vacuum table or clamps). Use sacrificial support underneath if through—cutting. Remove chips from the cut path (vacuum extraction or an air blast at the tool). Recirculating chips cause re—melting and can weld back onto the edge.
Cooling: Many CNC cuts in acrylic are done dry (air—cooled). You may use a mist coolant or air to keep the tool edge cool. Compressed air alone often suffices. If you use a water—based mist, verify compatibility, as some cutting emulsions can cause crazing. Avoid oil—based lubricants unless specifically intended for plastics.
When dialed in, a CNC router cut can be so clean it almost looks polished, especially with cast acrylic. Intricate designs like store signage lettering or machine parts are routinely CNC—routed for precision and repeatability. CNC machining also enables 3D profiling in acrylic, such as pockets or beveled edges.
Acrylic CNC Routing and Milling: Feeds & Speeds
Feeds and speeds when routing acrylic are about controlling heat and edge quality. The goal is to create solid chips that effectively dissipate heat. Thin chips rub and melt; thick chips can chatter, chip, or crack their edges.
Chip load is the amount of material each cutter tooth removes per revolution. Use it to size the chip so heat leaves with the chip instead of staying in the cut.
Chip load formula: Chip load (in/tooth) = Feed rate in inches-per-minute / [RPM × number of cutting edges].
Example feed calculation (1/4" / 6 mm): single-flute, 18,000 RPM, 90 IPM → 0.005 in/tooth (90 ÷ [18,000 × 1] = 0.005). 90 IPM ≈ 2,286 mm/min.
| CNC Chip Load Starter Settings (applies to any tool diameter): | Diameter (in) | Diameter (mm) | Chip-load (in/tooth) | Chip-load (mm/tooth) |
|---|---|---|---|
| 1/8 | 3 | 0.002–0.005 | 0.05–0.13 |
| 3/16 | 5 | 0.003–0.007 | 0.08–0.18 |
| 1/4 | 6 | 0.004–0.010 | 0.10–0.25 |
| 3/8 | 10 | 0.006–0.014 | 0.15–0.36 |
| 1/2 | 12 | 0.008–0.018 | 0.20–0.46 |
| Chip-load targets by tool diameter (use a sharp single-flute O-flute for chip evacuation) | |||
Problems & quick fixes:
- If you see melting, gumming, or a hazy edge: increase feed rate or reduce RPM to thicken the chip.
- If you see chatter, edge chipping, or cracking: reduce feed rate and check rigidity (tool stickout, workholding). Verify the tool is sharp.
- Keep chips cleared (vacuum or air); recutting chips adds heat.
Cut direction:
- Default to conventional cutting to reduce grabbing in brittle acrylic.
- On very rigid machines with excellent workholding, a light climb finish pass can improve edge quality.
Pass strategy for thicker stock (> 1/2" / 12.7 mm):
- Use multiple passes: rough, leaving 0.005–0.015" stock, then a light finishing pass.
- Finishing guidance: radial step-over ∼5–10% of tool diameter while maintaining a real chip load (avoid rubbing).
- Conservative roughing depth with a 1/4" tool: 0.3–0.5 × diameter on lighter machines; up to 1 × diameter on rigid setups.
Material note:
- Cast acrylic typically machines cleaner than extruded. Extruded may benefit from slightly lower RPM or a higher feed rate to maintain thick chips and has a better thickness tolerance than cast.
Acrylic Laser Cutting
Laser cutting excels at producing small, intricate parts, lettering, and decorative patterns that are tedious or impractical to create with a saw or router. It's contact-free and produces a narrow kerf (∼0.010–0.020").
 Material Preparation: It's best to use cast acrylic for laser engraving designs, but both cast and extruded acrylic cut well for cutting purposes. For engraving, cast acrylic produces a frosty, higher-contrast mark; extruded engraves clearer with less contrast. Use laser-compatible masking: remove standard paper unless it's explicitly rated as laser-safe, and avoid leaving standard PE film in the beam path, as it can melt and contaminate the edge. Use laser-cuttable film or unmask the cut path to prevent residue and edge defects.
 Cut Settings: Use the laser manufacturer's recommended settings for acrylic. Acrylic cuts cleanly without charring, but too slow of a cut can cause an extra wide heat—affected zone or melting. If you see bubbling or flame, increase the speed or use air assist. Air assist helps drive fumes out and keep the cut clear. Laser cutting seals the cut edge as it runs, often leaving a glossy, water—clear finish that needs no further polishing.
Laser-cut edges are highly stressed (≈0.010–0.050″ deep) and can craze when exposed to solvents or high mechanical stress. To reduce risk, anneal after cutting or lightly machine/scrape the edge before any solvent contact.
Thickness Limits: Many 60–100 W CO2 lasers can cut acrylic up to ∼1/4″ (6 mm) cleanly in one pass. Reaching 1/2″ (12 mm) generally requires higher power, slower feed rates, or multi-pass strategies, and results vary by machine and setup. For thicker stock, CNC routing may deliver straighter edges with less taper.
Safety: Laser cutting acrylic produces fumes (mostly methyl methacrylate monomer and byproducts) with an acrid odor. Always use proper exhaust ventilation. Never laser—cut unknown plastics in the same machine without cleaning. Design parts with reasonable spacing between cuts to prevent overheating small sections and allow them to cool before handling.
Acrylic Waterjet Cutting
Waterjet is great for thick parts, tight inside corners, and heat-sensitive jobs where laser cuts can taper or heat-damage the nearby material (the heat-affected zone, or HAZ).
Abrasive & Setup: Use 80–120 mesh garnet and a low-pressure pierce (or off-part pre-pierce with a lead-in) to prevent edge chips. Typical kerf 0.030–0.045" depending on orifice/mix tube. Expect slight taper; add micro-tabs for part retention.
Masking/Fixturing: Remove paper masking (it turns to pulp); use film masking or no mask. Support fully and keep parts from rocking.
Edge Quality: The surface is matte to semi-matte, compared to the laser's gloss; plan for a light scrape/sand/buff if a polished edge is required.
Post-processing & Bonding: Rinse parts, then dry thoroughly. If solvent-bonding, pre-dry at ∼170 °F (75 °C) to minimize moisture-related crazing. Anneal if parts will be exposed to solvents or stress.
When to choose waterjet: Very thick acrylic, parts with internal features a router struggles to reach, or when you want no thermal HAZ.
Advanced Acrylic Cutting: Saws and Routers for Special Cuts
Holes and Internal Cutouts: For large-diameter holes, a hole saw or fly cutter on a drill press can be used (go slowly and use coolant/air). For small holes or intricate internal shapes, drill a start hole and use a scroll saw or jigsaw. A CNC router or laser is the cleanest method if available.
Edge Finishing Saws: Production edge—finishing machines use diamond—coated blades or wheels to trim edges with a smooth, polished finish. A smooth edge makes for stronger, nearly invisible glue joints. For many straight edges, a jig with a flush—trim router bit or a jointer can true the edges.
Preventing Cracks at Cut Edges: Drill a small relief hole at interior corners before making final cuts to distribute stress. Avoid leaving sharp notches; machine or drill them round to prevent crack initiation points.
Acrylic Machining & Drilling: Starter Feeds, Speeds & Chip-Load
Once pieces are rough—cut to shape, you may need to perform additional machining operations: drilling holes, milling slots or recesses, turning on a lathe, or threading. Acrylic is relatively easy to machine with standard equipment; however, its brittleness and low heat tolerance require specific techniques for optimal results.
Drilling Acrylic
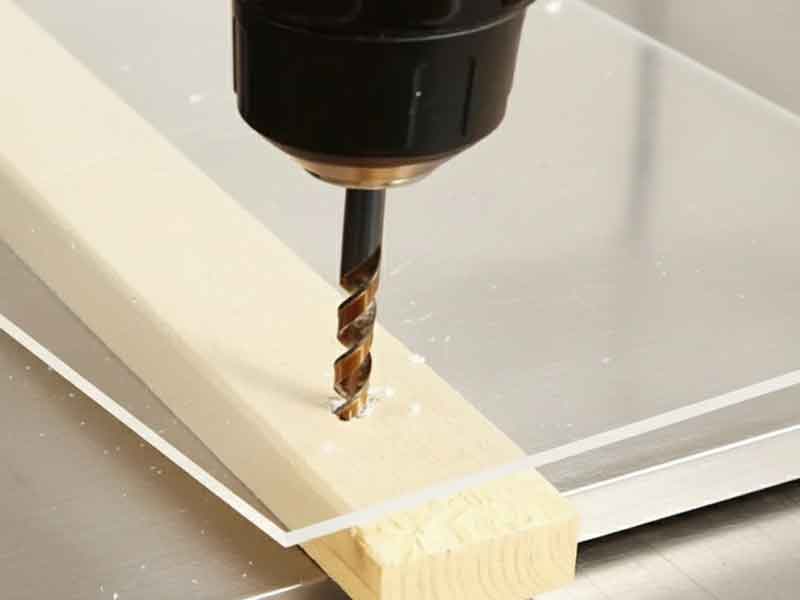 Use the right drill bit and technique to drill clean, smooth holes without splits.
Use the Right Drill Bit
Use acrylic-appropriate drill geometry: a point angle of ∼90° (85–95° is acceptable), a 15–30° helix, a neutral to slightly negative rake at the cutting lip (lightly dub the edges), and a 12–15° lip relief. This flatter point reduces grabbing; the moderate helix improves chip evacuation and surface finish.
If you're modifying a standard twist drill, regrind to ∼90°, add small flats to create neutral/slightly negative rake, and lightly polish the flutes. Avoid brad-point and wood bits.
| Drill Speed and Feed Guide (approximate spindle speeds) | |||
|---|---|---|---|
| Diameter (in) | Diameter (mm) | Approx. RPM | |
| 1/8″ | 3 | ∼3,500 | |
| 3/16″ | 5 | ∼2,500 | |
| 1/4″ | 6 | ∼1,800 | |
| 3/8″ | 10 | ∼1,200 | |
| 1/2″ | 12 | ∼900 | |
| 5/8″ | 16 | ∼700 | |
| Use light pressure – aim for continuous spiral chips, not powder. Use a peck drill on deep holes to clear chips and prevent heat buildup. | |||
Supporting the Work: Place a scrap backing board (wood or acrylic) under the sheet when drilling through. Securely clamp the acrylic and backing board together.
Technique
Start perpendicular, feed gently, and slow down near the breakthrough to avoid a sudden grab. Expect two continuous spiral chips when things are going well. Keep the drill spinning until fully out of the hole.
For larger holes (> 1/2″), consider a spade bit or hole saw designed for plastics, or drill a pilot and step up in increments. Fly-cutting on a mill or CNC machine avoids twist-drill stress.
After drilling, lightly chamfer or scrape to deburr. Countersink or chamfer entry/exit slightly for screws to reduce crack initiation and improve seating.
Reaming (Finishing Holes)
Use reaming to bring drilled holes to a precise size with smooth walls.
Tooling: Use straight-flute, slight back-taper reamers for plastics. Aim for a 0.005–0.015 in (0.13–0.38 mm) reaming allowance over the drilled pilot.
Speed/Feed (starting points): Run low RPM with a steady, light feed (e.g., ∼300–500 RPM for ∼1/4″ holes; ∼0.004–0.008 in/rev). Avoid heat and dwell.
Technique: Chamfer entry lightly; flooding isn't needed—use air blast or a plastic-safe mist. Do not reverse a reamer in the hole. Back the part with scrap to support breakthrough.
Finish & Stress: Deburr with a scraper/countersink. If the hole will be solvent-bonded or loaded, anneal to reduce stress.
Tapping and Threading
Tap Type: Use a cutting tap with a slow, careful approach; back out frequently to clear chips. Fluteless (forming) taps can cause cracking; cutting taps are more common. Lubricate with a drop of dish—soap solution or plastic—safe tapping fluid.
Thread Profile: Avoid fine threads. Use coarse threads (e.g., UNC instead of UNF). If possible, specify rounded thread profiles. Never force a tap; back off and clear chips. For external threads, use a die or single—point tool with coarse pitches and shallow depths.
Applications: Suitable only for light duty. For frequently engaged fasteners or load—bearing joints, use metal thread inserts (heat—set or press—fit) or design for nuts and bolts. Never over—tighten. Annealing after threading can help reduce stress.
Milling, Turning, and Routing (Machining)
Milling: Ensure machine rigidity. Use sharp end mills (1–2 flutes, high rake, good clearance). Carbide is a good balance of cost and durability. Run fairly fast but feed fast enough to avoid dwell. Clear chips often; consider ramping moves instead of straight plunges.
Lathe Turning: Use a sharp single—point cutter with neutral rake (0°) and adequate clearance to produce a scraping cut. HSS or carbide tools work; balance the work to prevent chatter. High surface speeds (e.g., 500–1000 SFPM) with light DOC can produce a smooth finish. Use coolant or compressed air; sand/polish on the lathe for glass—like finishes.
Avoiding Heat & Crazing: Heat is the enemy. Don't machine with a dull tool; don't dwell; add cooling. If you see melted chips or gummy edges, adjust parameters. Secure material to avoid vibration that generates heat and stress.
Filing & Hand Machining: Files and scrapers can straighten edges and remove marks. Use a safe—edge file; finish by sanding or scraping to remove sharp notches.
After significant machining, anneal the part before bonding or final finishing, especially if the piece will be exposed to solvents or stresses.
Stress-Relieving Acrylic (Annealing)
When to anneal
- Before solvent cementing or other solvent exposure.
- After heavy machining or forming, if parts will be subjected to loads or solvents.
- Support parts during anneal to prevent sag.
Annealing cycle
- Temperature: 176–180 °F (80 °C) in a forced-air (circulating) oven.
- Heat time: ≈1 hour per millimeter of thickness (minimum 2 hours for thin sheet).
- Cool down: Generally shorter than heat time. For >8 mm thickness, use: cooling time (hours) ≈ thickness (mm) ÷ 4.
- Removal: Do not remove parts until oven is below 140 °F (60 °C).
- Masking: Remove paper masking; plastic films may be left in place if verified on scrap.
| Annealing Quick Reference Guide (typical flat parts) | ||
|---|---|---|
| Thickness | Heat @ 176–180 °F (80 °C) | Cool in oven* |
| 3 mm (0.118″) | 3 h | 2 h |
| 6 mm (0.236″) | 6 h | 2 h |
| 12 mm (0.472″) | 12 h | 3 h |
| *Leave parts in the oven until temp falls below 140 °F (60 °C) before removal. | ||
Annealing Tips
- Light edge or surface machining mainly stresses the outer layer; a shorter cycle (about 2 hours of heat followed by at least 2 hours of in-oven cooling) is usually sufficient.
- Flame-polished edges are highly stressed; sand or anneal them before any solvent cementing.
Machining Acrylic Rod and Tube Forms
Machining Acrylic Rod — Turning (Lathe)
- Hold with collet or soft jaws; support with a live center/steady rest to control whip.
- Use a sharp neutral-rake tool, light DOC, and high surface speed with continuous feed; avoid dwell to limit heat.
- Parting: Use a narrow, sharp parting blade; feed steadily, clear chips with air. Face and scrape to deburr.
- Finish by wet-sanding and polishing on the lathe if optical edges are required.
Machining Acrylic Tube — Turning & Boring (Lathe)
- Prevent collapse with an internal mandrel or close-fit plug near the cut; support OD with a steady rest.
- Cutoff: Saw or part on the lathe; avoid roller-type tubing cutters (they induce cracks).
- ID finishing: Use boring bars or straight-flute reamers with light feed; chamfer ID/OD with a 90° countersink to reduce crack starts.
- Clean chips thoroughly; anneal if the tube will be bonded or exposed to solvents afterward.
Edge Finishing & Polishing Acrylic: Scrape, Sand, Flame, Buff (When to Use Each)
Scraping Acrylic
A quick method to remove saw/machining marks and take off sharp corners. Use a cabinet scraper or sharp chisel/utility blade held perpendicular and dragged along the edge to peel fine shavings, leaving a smoother surface and slight radius. Works best on straight or gently curved edges. Often used prior to solvent cementing for near—invisible joints.
Sanding Acrylic
Sanding removes deeper scratches or saw marks and prepares edges for a matte look or subsequent polishing. Use wet/dry sandpaper and wet sand if possible.
Process: Start with medium grit (e.g., 180–220) and work up to finer grits (400, 600, 1000+ for near—polish). Use a sanding block/backer. Keep paper moving to avoid heat. Stop at 400–600 for a matte edge or at ∼400 if planning to buff/flame polish. Be cautious with power sanders; keep moving and cool often. Rinse and dry before polishing.
Buffing Acrylic (Wheel Polishing)
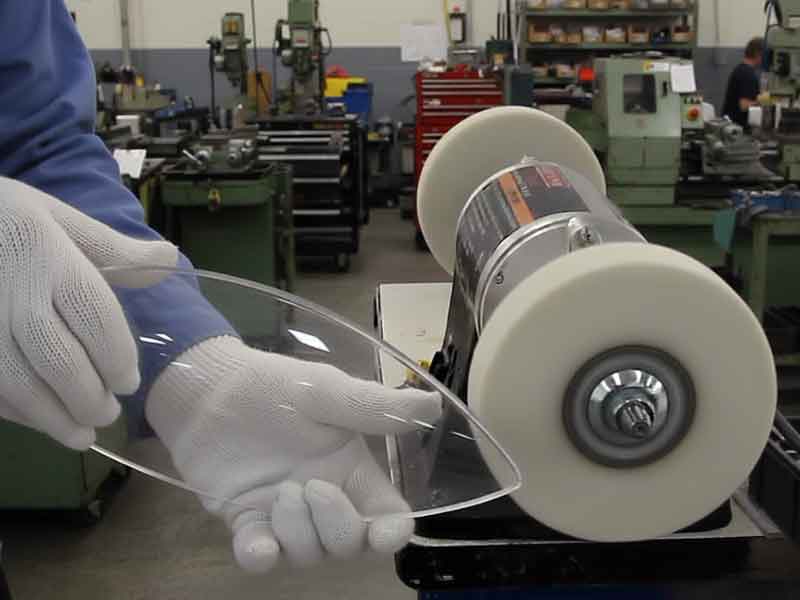 Machine buffing with muslin wheels (8–14″ diameter, 2–3″ wide) can quickly produce a gleaming edge.
Polishing Compound
- Recommended two-step process:
- Medium/fast—cutting compound to remove fine scratches.
- Fine compound on a clean wheel for final high gloss.
- One—step compounds can work if the edge is well—prepped. Use separate wheels for different compounds.
Technique: Charge the wheel, then press the edge lightly while moving continuously. Avoid lingering to prevent overheating/warping. Hold at a slight angle so only the edge touches. After coarse buff, wipe clean and buff on the fine wheel. Watch heat; back off if hot to the touch. Note: polishing rounds edges slightly and can reduce solvent—wicking; re—sand lightly if gluing after polish.
Flame Polishing Acrylic
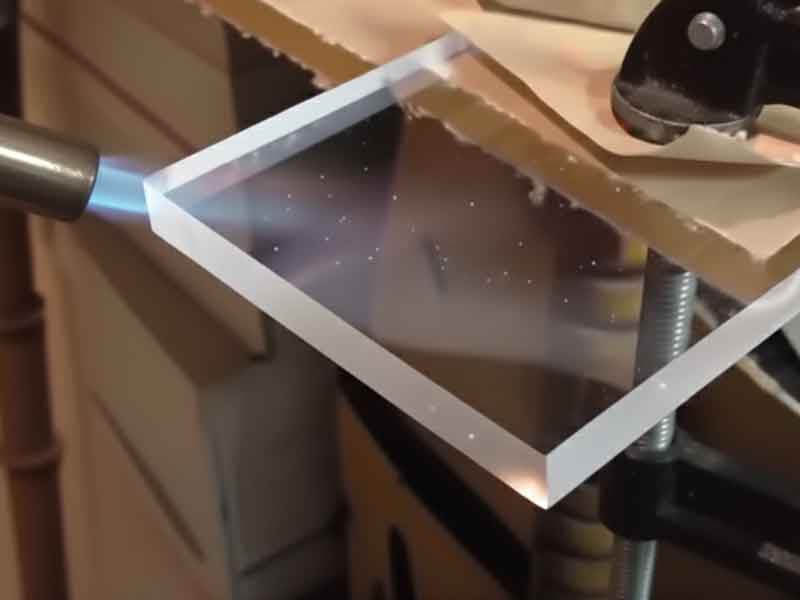 A rapid method to polish edges by remelting the surface.
- Equipment: Oxy—hydrogen torch preferred (clean, hot, narrow flame). Propane/MAPP can be used with care.
- Surface Prep: Sand edges smooth first (e.g., to 400 grit). Flame polishing won't hide saw marks or deep scratches.
- Technique: Remove masking from the edge. Hold torch a couple inches away and sweep along the edge at ∼3–4 in/s. Use a small, narrow flame with a light blue inner cone. Make one pass, let cool; if needed, make additional quick passes after full cooling. Keep flame off the flat faces. Practice on scrap.
- Important: Flame polishing induces surface stress. Never solvent—cement a flame—polished edge without sanding or annealing first. For outdoor/high—stress use, consider annealing after flame polishing.
Painting & Printing on Acrylic: Surface Prep, Primers & Inks
General cautions: Acrylic is solvent-sensitive; high-solvent paints/inks or dirty, stressed surfaces can cause crazing. Prefer plastic-compatible systems, keep temps modest, and test on scrap.
Painting Acrylic (front-surface)
Prep: Remove dust. Wet-sand 600–800 grit for tooth if opacity is desired; keep edges cool. Clean with mild soap + water or plastic cleaner; avoid alcohol/ammonia to reduce crazing risk. Dry with ionized air/anti-static wipe.
Masking: Use low-tack, plastic-safe tapes/films.
Primer: Use a plastic adhesion promoter or primer recommended for PMMA (per paint system).
Coats: Apply multiple light coats (waterborne acrylic or 2K polyurethane formulated for plastics). Flash between coats; avoid heavy wet coats.
Cure: Air cure or low-temp bake ≤150 °F (65 °C) to avoid warp.
Edge management: Keep paint off bond areas; lightly sand paint edges if parts will be bonded later.
Reverse (second-surface) painting
Apply paint to the back (inside) face for a glossy, protected finish. Mirror the artwork. Apply color first, then an opaque backing. Keep the viewing face polished.
Printing on Acrylic
- Screen/UV ink systems labeled for PMMA give the best adhesion. Pre-clean as above; for difficult inks, use corona/flame pretreat lightly.
- Control static and dust, keep parts low-stress (anneal if needed). Validate with ASTM D3359 cross-hatch adhesion test.
- Digital UV: Verify lamp output and substrate temperature; avoid over-curing that can embrittle the surface.
Polishing Acrylic After Painting or Printing
- Do not flame-polish any painted/printed surface.
- After full cure, remove dust nibs/orange peel by wet-sanding 1000→1500→2000 grit, keeping the panel cool.
- Machine buff with a clean foam pad and a plastic-safe fine polish, light pressure/low speed. Protect edges with tape; avoid polishing through thin paint.
- For second-surface painted parts, polish the outer, unpainted face as usual (sanding → buffing). Re-clean before assembly.
Acrylic Bonding & Assembly: Solvent Cementing vs. Structural Adhesives
 Acrylic can be joined by solvent cementing, adhesive bonding, and mechanical fastening.
Acrylic Solvent Cementing (Chemical Welding)
Temporarily softens acrylic surfaces so they fuse together as one for clear, clean—looking joints.
- Capillary Cementing: Standard method for flat joints/right angles (e.g., boxes, aquaria). Arrange pieces in final position (use jigs/fixtures). Apply water—thin solvent cement at the joint with a syringe or fine applicator; it wicks by capillary action and softens surfaces within seconds. Initial set is quick; leave clamped 3–5 minutes. Allow at least 3 hours before minor handling and 24–48 hours for maximum strength.
- Ensure tight contact (no gaps). Use light pressure/weights; too much pressure starves the joint.
- Apply evenly — use just enough to wet the joint without puddling/runs.
- Provide good ventilation; avoid skin contact.
- Do not disturb the joint for the first few minutes.
- Blushing: White frost can appear from moisture/rapid evaporation. Work below ∼50% RH and avoid disturbing the joint as it dries.
Soak/Dip Cementing: For larger flat surfaces or imperfect edges. Soften one piece's edge by dipping in solvent briefly, then press against the second piece. Fills small gaps because the edge turns syrupy. Hold with light pressure as it resolidifies (initial bond ∼30 s; set in minutes; full strength in a day). Useful for thick material where capillary action can't reach the full depth. Control dip time to avoid turning to mush; visibility of glue lines is higher.
Viscous Solvent Cements: Thicker cements containing dissolved acrylic resin (applied as a bead) can fill small gaps and set slower for more working time. Joint clarity is slightly less perfect. Clamp lightly until cured (several hours to overnight).
General Notes: Solvent joints reach ∼80% strength after 24 hours and continue to strengthen over weeks. If maximum strength is needed, allow 1–2 days before stressing. Solvents can reveal frozen—in stresses; anneal components before gluing when possible.
Polymerizable & Specialty Adhesives
Polymerizable Acrylic Cements: Mixes of acrylic monomer and catalyst (or UV—curing adhesives) form fully polymerized acrylic bonds with long working time and strong, clear joints. Surfaces generally must fit well; UV types require UV transmission on at least one side.
Epoxies and Cyanoacrylates: Epoxies can bond acrylic (especially to other materials) but usually aren't as strong as solvent welds; choose clear, non—yellowing types. Cyanoacrylates can cause instant crazing and are generally not recommended for structural joints.
Flexible Adhesives: For joints requiring flexibility or dissimilar materials, silicone sealants, polyurethanes, or MS polymers can be used to accommodate differential expansion.
Mechanical Fastening
Mechanical fastening is especially useful when attaching acrylic to other materials (e.g., metal frames). Drill oversized holes and use rubber grommets to allow movement and prevent direct metal-to-acrylic contact. Always account for different coefficients of thermal expansion.
Clearance Holes: Allow for acrylic's thermal growth. Rule of thumb: For acrylic with CTE ≈ 0.000039 in/in-°F, a 48″ panel changes ≈0.0019″ per °F. Example: a 24″ panel over a 100 °F swing grows ≈0.094″. Use oversize holes and slots for fixed points. Keep screws snug, not tight. Avoid deep countersinks.
Washers and Spacers: Always use washers (preferably rubber or bushings) to spread the load and reduce point stress. Use nylon hardware or lock nuts in high-vibration assemblies.
Tightening Torque: Snug is enough. Tighten until the washer just contacts the surface, plus ∼1/8 turn. Use thread—locker/locknuts rather than excess torque.
Threaded Inserts: Use heat—staked or glued inserts for frequently removed screws.
Rivets: Use backing washers and correct grip; plastic rivets can be safer for thin acrylic.
Hinges/Moving Parts: Prefer many small fasteners; keep slightly loose. Consider solvent-bonded standoffs or adhesive hinges to eliminate the need for screws.
Bonding Acrylic to Other Materials
Acrylic to Polycarbonate/ABS: Specialty solvent blends exist, but are tricky. Two—part epoxies or acrylic adhesives formulated for plastics are often better. Scuff and clean surfaces.
Acrylic to PVC/Vinyl: Cyclohexanone can sometimes work; often polyurethane or UV—curing acrylic glues are used. Silicone can bond moderately well for window/frame sealing.
Acrylic to Metal: Use mechanical fastening or appropriate adhesives (e.g., MMA metal bonders, clear epoxies). Clean/prime metal as required.
Final Bonding Tips
Cleanliness: Degrease bonding surfaces with a plastics-approved cleaner or naphtha/heptane using lint-free wipes. Let them fully dry and avoid touching the prepared edges. If isopropyl alcohol is the only option (avoid if possible), use a light, quick wipe on stress-free, sanded/machined edges only; do not use IPA on laser-cut or flame-polished surfaces.
Joint Design: Prefer flush, well—fitting contact joints. Acrylic doesn't gap—fill easily without losing clarity/strength. Add gussets/fillets for reinforcement as needed.
Blush and Bloom: Warm parts slightly or use slower solvents to reduce whitening. Keeping protective masking near the joint can absorb some vapor.
Polished vs. Sanded: Solvents "bite" better on lightly sanded/machined edges. When gluing polished edges, use a solvent with a small amount of dissolved acrylic to enhance bite and gap filling.
Allow adequate curing time. For critical joints, give an extra day or two before stressing. Annealing after several days can increase joint strength.
Thermoforming Acrylic (Drape, Vacuum, Line-Bend): Temps, Shrinkage & Annealing
Cold Bending Acrylic (Flexing without Heat)
Acrylic can be cold-bent only to very gentle radii. Use a minimum bend radius of ∼330× sheet thickness for standard cast or extruded acrylic (e.g., 1/8" [0.118"] ≈ 39" radius). Certain grades (e.g., impact-modified/LED/Resist-grade) may allow ∼240× thickness (1/8" ≈ 28"); always confirm with the datasheet for the specific brand you are using.
Allow edges and fasteners to move (oversize holes/slots), expect spring-back, and avoid solvent exposure near cold-bent edges, which can lead to crazing. For tighter radii or bonded parts, heat form instead.
Line Bending Acrylic (Strip Heating)
- Remove protective masking in the bend area.
- For sharp 90° bends, use a narrow heater; a narrow heat band yields a tighter bend. For razor—sharp corners, pre—cut a V—groove on the inside of the bend.
- Heat until pliable (e.g., ∼1/8″ thickness often takes a minute or two on a strip heater). Do not overheat to the point of bubbling/scorching.
- Bend to the desired angle quickly and hold in a jig until it cools (usually a minute or two).
- For long bends (> ∼2 ft), ensure uniform heating (move through the heater, use multiple heaters, or flip midway). Manage sag by flipping for even through—thickness heating.
- Anneal at 176–180°F (80°C) ∼1 h per mm (min 2 h). Cool in oven (generally shorter than heating time); remove parts below 140 °F (60 °C).
| Line-Bend Thickness Limits — Typical Starting Points | ||||
|---|---|---|---|---|
| Sheet Thickness | Min Inside Radius (×t) | Heat Band Width | Heat Time per Pass | Heater Sides |
| 1/16″ (1.5 mm) | 1.0–1.25×t | ∼3–4 mm (∼1/8″) | 20–40 s | 1 side |
| 1/8″ (3 mm) | 1.0–1.25×t | ∼6–8 mm (∼1/4–5/16″) | 60–90 s | 1 side |
| 3/16″ (4.5 mm) | 1.0–1.5×t | ∼10–12 mm (∼3/8–1/2″) | 2–3 min | 1–2 sides |
| 1/4″ (6 mm) | 1.5–2.0×t | ∼12–15 mm (∼1/2–5/8″) | 3–4 min | 2 sides |
| 3/8″ (9.5 mm) | 1.5–2.0×t | ∼18–22 mm (∼3/4–7/8″) | 5–7 min | 2 sides |
| 1/2″ (12 mm) | 2.0–3.0×t | ∼24–28 mm (∼1–1 1/8″) | 8–12 min | 2 sides |
|
Notes
|
||||
Oven Thermoforming Acrylic (Heating the Entire Sheet)
 Acrylic begins to soften near its glass-transition (∼210–220 °F) but forms best within grade-specific windows: extruded acrylic typically 290–320 °F (some lines specify 270–350 °F), while cast acrylic commonly forms around ∼320–350+ °F (many cast grades quote 340–380 °F for deep draws). Heat evenly (convection or IR) until the core reaches the forming temperature (≈ 3–5 min for 1/8″, 10–15 min for 1/4″). Pre-dry ∼170 °F if you see moisture bubbles. Remove paper masking unless using high-temperature masking.
| Brand Specific Acrylic Forming Windows | |||
|---|---|---|---|
| Brand | Grade / Type | Forming Window °F (°C) | Process Notes |
| OPTIX | Extruded | 270–350 (132–177) | Target sheet temp for vacuum forming; heat both sides uniformly. |
| OPTIX | Continuous-cast (OPTIX-L®, formerly LuciteLux®) | 290–350 (143–177) | Use OPTIX-L fabrication guide for exact set-points; condition then form. |
| ACRYLITE | Extruded (FF) | 290–320 (143–160) | General extruded guidance: heat both sides evenly; use low end for shallow draws/high end for deep; avoid hot spots; brief post-form anneal can reduce stress. |
| ACRYLITE | Cast (GP/OP-4 and related) | 340–380 (171–193) | OP-4 becomes pliable near ∼320 °F; deep draws typically 340–380 °F. |
| ACRYLITE | Impact-modified / LED grades (e.g., Resist 45/65, LED Sign) | 290–320 (143–160) | Start with FF range; stay toward low end to limit sag and preserve optics/impact properties; confirm the specific grade’s datasheet. |
| Lucite | Cast (Lucite® L) | 290–350 (143–177) | Hold oven ∼20–40 °F above target sheet temp; cool slowly on mold; demold <∼165 °F; avoid forced-air cooling. |
| Lucite | Continuous-process (Lucite® CP) | 290–320 (143–160) | Hold oven ∼20–40 °F above target sheet temp; cool slowly on mold; demold <∼165 °F; avoid forced-air cooling. |
| Lucite | Continuous-process high-MW (Lucite® CPX™) | 290–340 (143–171) | Hold oven ∼20–40 °F above target sheet temp; cool slowly on mold; demold <∼165 °F; avoid forced-air cooling. |
Oven setup tips from Lucite bulletin: hold oven ∼20–40 °F above target sheet temperature, cool slowly on the mold, demold below ∼165 °F, and avoid forced-air cooling to minimize stress.
Drape Forming: Drape a softened sheet over a convex mold; use gravity/light pressure. Cover molds with a soft cloth (flannel/felt) to avoid imprinting texture. Preheat molds slightly to avoid rapid cooling.
Vacuum Forming: Heat and pull the sheet into a female mold with vacuum. Use airtight seals and venting; consider assist plugs or prestretch for deep draws. Acrylic's stiffer melt may require higher vacuum and uniform heating. Dry if moisture is present.
Free Blowing / Bubble Forming: Clamp a heated sheet and blow compressed air under it to create a dome. Control pressure for consistent spherical sections.
Mold Considerations: Acrylic shrinks slightly on cooling (∼2% typical). Extruded acrylic has anisotropic shrinkage (up to ∼3% in the extrusion/machine direction and ∼0–0.5% in the transverse), while cast acrylic shrinks more uniformly (∼1.5–2%). Use generous radii on molds (≥ 1–2× sheet thickness). Keep parts on the mold until cooled below ∼140 °F to avoid warping. Use the same expansion allowance in your mounting design (0.002" per 48" per °F) so parts don't warp or craze in service.
Examples & Notes: Used for machine guards, appliance covers, and raised—letter sign faces. High—impact modified acrylic grades (e.g., Plexiglas DR, Plaskolite Duraplex) offer better melt strength and a broad forming range.
Post—Forming Considerations
- Anneal formed parts if they will undergo secondary operations or solvent contact.
- Trim edges with a router or saw, leaving an extra flange for trimming, as this is often easier than forming to net shape.
- Reheating formed acrylic tends to return it to its flat state (memory effect) and can embrittle; aim to form it correctly in one cycle.
Acrylic Fabrication Common Problems & Fixes
| Symptom | Likely Cause | Fix |
|---|---|---|
| Melted/galled saw or CNC edge | Feed too slow, RPM too high, dull tooling, poor chip evacuation | Increase feed until you get solid chips; reduce RPM slightly; use sharp TCG blade or sharp O-flute; add air/mist and strong vacuum. |
| Edge chipping/breakout (saw/CNC) | Excess feed, wrong tooth form, inadequate support | Slow feed slightly; use carbide TCG, high tooth count; add zero-clearance/backer; keep film on; conventional cut, then light climb finish on rigid setups. |
| Drill "grab," conical cracks, exit blow-out | Standard wood/metal bit geometry; no pecking; tight hole; no backer | Use acrylic-friendly bit (∼90° point, neutral/negative rake, 12–15° lip relief); peck; back up exit; deburr and chamfer. |
| Laser-cut edges craze after bonding/cleaning | Heat-affected, high-stress edge meets solvent | Anneal parts or lightly machine/scrape the laser edge before solvent contact; use compatible cleaners. |
| White line at bend (stress whitening) | Heat band too narrow; radius too tight; core too cold | Reheat more broadly; use ≥ minimum inside radius from your table; flip to heat through thickness. |
| Bubbles during heating/forming | Moisture in sheet; localized overheating | Pre-dry/anneal ∼176–180 °F (80 °C), ≈1 h/mm (min ∼2 h); heat uniformly; stay in forming window. |
| Webbing/thinning in deep draw | Over-temperature; uneven heat; aggressive draw | Lower sheet temp slightly; balance top/bottom heat; add pre-stretch/plug assist; increase radii/draft. |
| Bubbly or frosted solvent joint | Excess solvent; trapped stress; laser edge; humidity/dust | Wick smaller amounts; fixture to avoid stress; edge-prep (scrape/machine) before bonding; work clean/dry; anneal pre-bond if stressed. |
| Crazing days/weeks after bonding | Residual stress + solvent; tight fits; harsh cleaners | Anneal per cycle (∼176–180 °F, ≈1 h/mm; cool in oven, remove <140 °F); allow expansion; use compatible cleaners. |
| Cracks radiating from holes/fasteners | Holes too tight; sharp edges; over-torque; no expansion allowance | Enlarge/slot holes; deburr/chamfer; use nylon/compliant washers; reduce torque; design for thermal movement. |
| Flame-polished edges crack later | Surface stress from flame meets solvent | Prefer mechanical polish for bonded parts; otherwise anneal before solvent exposure or re-edge-prep. |
| Poor print/paint adhesion | Contamination; incompatible chemistry; low surface energy | Clean with mild, approved cleaners; light mechanical scuff if spec allows; confirm ink/paint compatibility. |
| Haze/micro-scratches after cleaning | Abrasive wipes; ammonia/alcohol; dry wiping | Rinse first; use soft, damp microfiber with mild soap; avoid ammonia/alcohol; plastic-safe polish if needed. |
| Panel stress after install (bowing/noise/cracks) | No expansion room; over-tightened fasteners; incompatible sealants | Resize slots/clearances; reduce torque; use compatible gaskets/sealants; allow thermal movement. |
Application—Specific Acrylic Tips
Signage and Displays
For outdoor signs, allow for expansion (oversize holes/slots per the 0.002" per 48" per °F rule and use rubber gaskets). For printed graphics (second—surface), ensure acrylic is clean and stress—free to avoid ink adhesion issues or crazing. Painting slightly reduces impact strength; consider thicker material or add ribs for high—wind areas.
Machine Shops (Technical Parts)
Use sharp tooling, appropriate speeds, and cooling to maintain clarity and tolerance. Avoid threads where possible (prefer bolts/inserts). Anneal after machining for dimensional stability. Acrylic's heat deflection is ∼200 °F; avoid high—heat service. For optical parts, polishing is key (diamond fly—cutting followed by polishing or vapor polishing).
Architectural Fabrication
Form large pieces via free—blow or vacuum forming. Design mounting systems that allow panels to float (utilizing gaskets) to accommodate expansion and prevent point loads. For safety barriers, polycarbonate may be used for higher impact resistance, but acrylic offers better clarity and scratch resistance. Options include thicker acrylic or scratch—resistant coatings. Exposed edges often receive flame polishing.
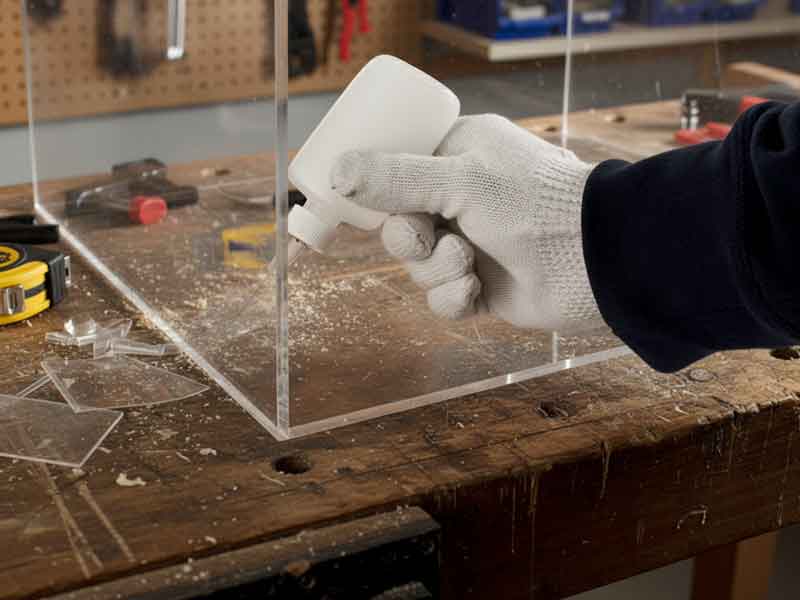
Acrylic Safety, Handling, and Storage
This guide summarizes practices sourced from our manufacturers and provides general, typical figures. Always consult the official manufacturer documentation for the specific grade and brand of acrylic you are using, and follow those instructions if they differ.
Handle with care: Support large sheets to prevent flexing and cracks. Use suction cups or team lifts. Cut edges are sharp—wear cut-resistant gloves and safety glasses.
Keep masking on: Leave film/paper masking during layout and cutting; mark lines on the masking. Keep benches clean and avoid sliding sheets without interleaf paper.
Cleaning: Use mild soap and water or plastic-safe cleaners. Avoid ammonia or alcohol (can cause crazing). For static, use anti-static spray or ionized air, not a dry cloth.
Heat and fire: Acrylic is combustible. Keep away from open flame and high heat unless heat-forming. Remove paper masking before laser or heat work. Ventilate the area well and keep an extinguisher nearby.
Workshop PPE: Always wear eye protection; add hearing protection with saws/routers. Use a dust mask or respirator when sanding or routing to protect your health. Clear chips; chip shavings are slippery.
Storage: Store flat with full support or nearly vertical in supported racks. Keep cool and dry; avoid high heat (over ∼100 F) and prolonged sunlight to prevent warping or masking adhesion.
This guide was authored by Christopher Isar and reviewed for technical accuracy by Chris Clark.

About the Author
At Interstate Advanced Materials, Christopher Isar turns "it depends" into "do this." Since 2011, he's helped buyers choose plastics with confidence by focusing on what works on the shop floor and in the field, backed by IAPD Level 2 certification. If your project can't miss, Chris will guide you to cost-effective, real-world options. Contact Chris.