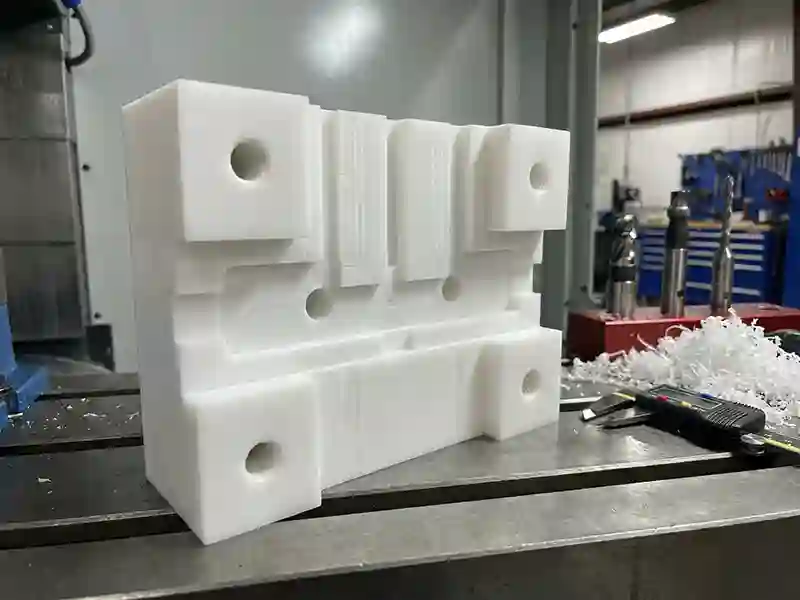
How to Cut & Machine HDPE: The Ultimate Fabrication Guide

 High Density Polyethylene (HDPE) cuts fast, resists chemicals, and absorbs impact, provided you control heat and stress. If you treat it like metal or wood without adjusting your approach, you will face melted edges ("gumming") and unpredictable warping.
This Interstate Plastics guide covers:
- Tooling Recommendations: Geometry specifically designed to clear chips and eliminate heat buildup.
- Fabrication Techniques: Step-by-step methods for drilling, routing, and cutting HDPE without melting or binding.
- Workholding Strategies: How to secure slippery sheets without crushing or deforming the part.
- Troubleshooting: Proven fixes for chatter, re-welded chips, and dimensional instability.
- Where to Buy: Check out our selection of available HDPE plastics.
Use the quick-start tables below to match your tooling and manage your heat, then jump directly to the fabrication process you're running:
- Machining HDPE: Why It's Hard to Cut Cleanly & Essential Fabrication Rules
- How to Cut HDPE: Pick the Right Process in 60 Seconds
- HDPE Machining Preparation & Safety
- Cutting HDPE Sheet: Manual & Shop Saws
- CNC Machining HDPE: Feeds, Speeds & Tooling
- Drilling & Tapping HDPE: Preventing Wrap & Strip-Out
- Turning HDPE Rod & Tube on a Lathe
- Bending & Forming HDPE: Managing Springback
- HDPE Finishing & Post-Processing: Achieving a Clean Edge
- How to Join HDPE: Welding, Fastening & Adhesives
- Designing for HDPE: Dimensional Stability & Tolerances
- Troubleshooting Common HDPE Machining Defects
- Should You Outsource Your HDPE Fabrication?
- HDPE Cleaning & Chemical Compatibility
- FAQ for Machining & Fabricating HDPE
Machining HDPE: Why It's Hard to Cut Cleanly & Essential Fabrication Rules
 HDPE is soft and forgiving compared to metals, but it presents unique challenges stemming from its thermal and mechanical properties. If you treat it like aluminum or wood, you will encounter melted edges ("gumming"), re-welded chips, and parts that warp after machining.
To machine HDPE successfully, you must manage four key characteristics:
- Thermal Sensitivity: HDPE has a narrow processing window, typically melting/softening in the 248°F – 275°F (120°C – 135°C) range. Friction from a dull tool or a dwelling cutter will push the material into this melt zone almost instantly.
- Thermal Insulation: Unlike metals, HDPE does not conduct heat away from the cut. The workpiece stays cool while the heat concentrates entirely in the tool and the chip. If you don't evacuate the chip, you are recycling heat directly back into the cut.
- High Thermal Expansion: HDPE expands and contracts significantly more than metals (roughly 10x the rate of steel). Dimensions verified in a hot shop may be out of tolerance in a cool installation environment.
- Low Friction: HDPE is naturally slippery (low coefficient of friction). This makes workholding difficult, as standard clamps may allow the part to slip or creep under cutter load.
The Three Rules of HDPE Fabrication
If you follow these three rules, you will prevent most common fabrication failures.
- Make Chips, Don't Rub: If you see dust, fuzz, or smears, you are generating friction (heat) rather than shearing the material. You must maintain a high enough chip load (the size of the "bite" each tooth takes per revolution) to slice clean "ribbons" of plastic. Never let a tool dwell in one spot.
- Get the Chip Out of the Cut: Recutting a hot chip is the fastest way to ruin a surface finish. Since the chip carries the heat, it must be ejected immediately. Air blasts, vacuums, and high-helix tools (O-flutes) matter more than simply slowing down your feed rate.
- Control the Part (Don't Crush It): HDPE will flex, creep, and move with temperature. You cannot simply "clamp it tighter" like steel, or you will induce stress that warps the part later. Use vacuum tables, soft jaws, or distributed clamping to hold the material without deforming it.
How to Cut HDPE: Pick the Right Process in 60 Seconds
The "best" tool for HDPE depends entirely on the geometry you need and the heat you generate. Use this guide to match your equipment to the job.
Tool Selection Guide: Picking the Right Tool for Machining HDPE
| Tool | Best Application | Primary Risk | The Fix |
|---|---|---|---|
| Table Saw / Panel Saw | Long, straight cuts in sheet stock (fastest method). | High friction on the blade body causes edge melt. | Prioritize blade geometry (Triple-Chip Grind) and keep the feed rate up. |
| Band Saw | Thick blocks (>1"), irregular shapes, and roughing. | Chips welding back together behind the cut. | Use a coarse tooth pitch (3-6 TPI) to clear the large volume of swarf. |
| Router (Handheld/CNC) | Complex profiles, pockets, and repeatable nesting. | Chip packing in the flutes (clogging). | Use plastic-specific geometry (O-flute / single-flute bits) with large gullets. |
| Mill / Lathe | Precision machining and turned parts. | "Metalworking habits" (low feed, high RPM). | Avoid 4-flute end mills. Increase feed rate significantly to prevent rubbing. |
The 10-Second HDPE Success Checklist
Stop immediately and adjust if you don't see these three signs of successful HDPE machining:
| Inspection Point | ✅ PASS (Good) | ❌ FAIL (Bad) |
|---|---|---|
| 1. The Chips | Curled, continuous ribbons. Means heat is leaving with the chip. |
Dust, powder, or fuzz. Means you are rubbing (generating heat). |
| 2. The Edge | Clean and matte. Standard machine finish. |
Glossy, smeared, or burred. Means the plastic is re-welding (melting). |
| 3. The Part | Stays flat when unclamped. Stress is managed. |
Bows, cups, or twists. Means internal stress was released or clamping was too tight. |
HDPE Machining Preparation & Safety
Success with HDPE is 90% preparation. Because the material is slippery, prone to melting, and ductile (forming long, stringy ribbons rather than breaking into chips), you must secure it differently than with wood or metal.
Safety: The "Bird's Nest" Hazard
 HDPE forms long, continuous ribbons rather than small chips. This creates unique risks:
- Chip Wrapping: Long strands can instantly wrap around the spinning tool or chuck (creating a "bird's nest"). Never reach in to clear these by hand while the spindle is turning; the HDPE is strong enough to pull a glove (and your hand) into the cutter.
- Kickback & Binding: Because HDPE releases internal stress when cut, the kerf can "pinch" the blade behind the cut. Riving knives are mandatory on table saws. Ensure your outfeed support is perfectly level to prevent the sheet's own weight from closing the cut.
Material Selection: Standard vs. Stress-Relieved
- General Purpose: Standard extruded HDPE is cost-effective but has high internal stress. If you remove skin from one side, the sheet will bow.
- Precision Parts: If you are machining large flat panels or complex geometries with deep pockets, specify Stress-Relieved (SR) Sheet. While more expensive, it has been annealed to minimize the "potato chip" warping effect after machining.
- Pro Tip: Check the datasheet. Expansion rates vary significantly between grades.
Workholding: Overcoming the "Slippery Factor"
HDPE has a low coefficient of friction (it is self-lubricating). Standard clamping pressure often fails because the part squirts out or deforms.
| Method | Effectiveness | Best Practice |
|---|---|---|
| Vacuum Table | (Best) | Ideal for sheet goods. The distributed pressure holds the sheet flat without inducing point-stress that causes warping. |
| Mechanical Clamps | (Good) | Use soft jaws or wide distribution blocks. Avoid point-loads (like toggle clamps directly on the surface) which will "dish" the plastic. |
| Screws (Spoilboard) | (Okay) | Drill oversize holes in the part to allow it to expand/contract around the screw shank without buckling. |
| Double-Sided Tape | (Risky) | Not recommended. HDPE is a "Low Surface Energy" (LSE) plastic; most tapes will not stick reliably enough to resist cutting forces. |
Coolant Strategy: Air is Usually Enough
- Primary: Compressed Air. An active air blast (or Vortex tube) is standard for 90% of HDPE machining. It clears the chip (removing the heat source) and cools the tool interface.
- Secondary: Water/Mist. For deep drilling (>5x diameter) where chip evacuation is difficult, water-soluble coolants help lubricate the hole and flush swarf.
- Note: Avoid oil-based coolants if the part requires subsequent painting or bonding, as HDPE absorbs oils slightly. More importantly, because HDPE is already naturally self-lubricating and slippery, coating the part in an oil-based coolant can make it practically impossible to hold securely in your fixtures for secondary machining operations.
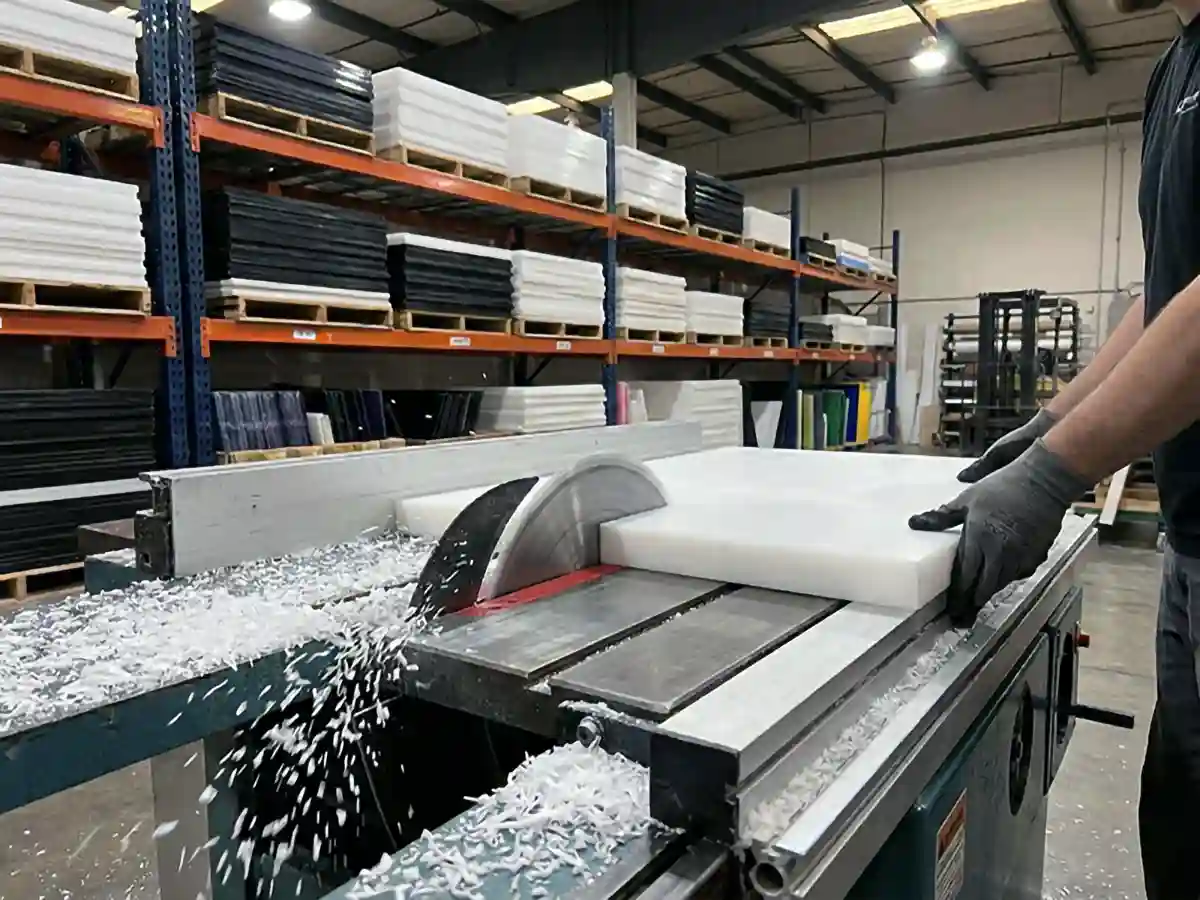
Cutting HDPE Sheet: Manual & Shop Saws
Because HDPE insulates heat, your choice of blade geometry defines your success. If the blade rubs, the plastic melts. If the blade cuts, the plastic stays cool.
| Tool | Recommended Blade Type | Tooth Count (Pitch) | Troubleshooting Cue |
|---|---|---|---|
| Table Saw | Carbide Tipped Triple-Chip Grind (TCG) |
80 Tooth (Sheet < 1/4") 60-80 Tooth (1/4" - 1") 40-50 Tooth (Plate > 1") |
High-pitched whine? You are feeding too slowly (rubbing). Increase feed pressure steadily. |
| Band Saw | Carbon / Bi-Metal Skip Tooth or Hook Tooth |
10-14 TPI (Sheet < 1/4") 6-8 TPI (1/4" - 1") 3-4 TPI (Plate > 1") |
Blade wandering? The gullets are packed with chips. Switch to a coarser blade (fewer teeth). |
| Circular Saw | Carbide Tipped Standard 7-1/4" Blade |
60 Tooth (Sheet < 1/2") 40 Tooth (Sheet > 1/2") Avoid 24T framing blades. |
Kickback or binding? The saw is twisting. Use a straight-edge guide; never freehand. |
| Jigsaw | HSS / Bi-Metal Wood-Cutting Geometry |
10-12 TPI (Sheet < 1/4") 6-8 TPI (Sheet > 1/4") |
Melting behind the cut? Turn off the "orbital" action (set to 0 or Low) to reduce friction. |
Table Saws & Panel Saws (Best for Straight Cuts)
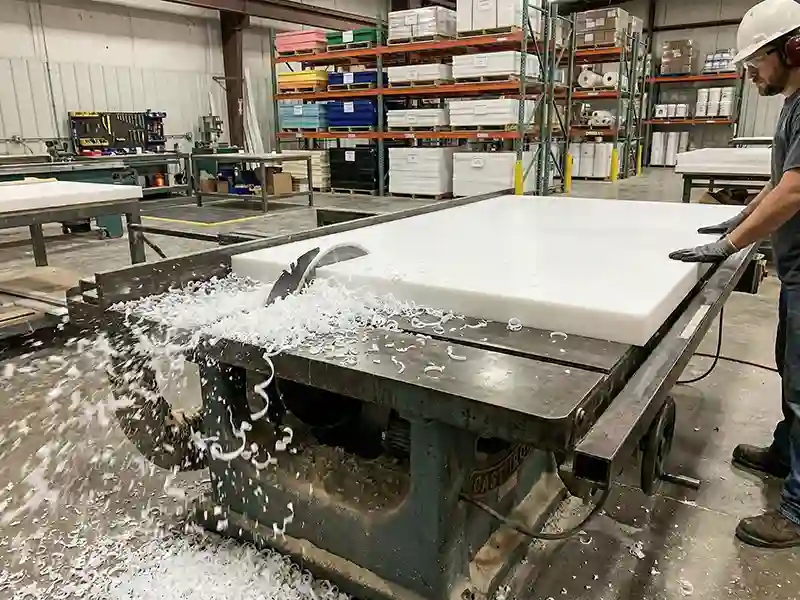
- Blade Selection: Use a Carbide-Tipped blade. For the cleanest edge, look for a Triple-Chip Grind (TCG) or a plastic-specific blade with a negative hook angle (-5° to 0°). This geometry "scrapes" the plastic rather than grabbing it, reducing the risk of chipping and climbing.
- Blade Height: Set the blade height to extend 1/4" to 1/2" above the material. Too low increases friction/rubbing at the bottom of the cut (causes melting). Too high increases vibration and risk of chipping the bottom edge.
- Feed Rate: You must commit to the cut. Hesitation creates heat. Feed the material firmly and consistently.
- Managing Thickness:
- Thin Sheet (< 1/4"): HDPE is flexible. Use a Zero-Clearance Insert or a sacrificial backer board (plywood/MDF) underneath to prevent the sheet from vibrating, slapping, or cracking at the cut line.
- Thick Plate (> 1"): The risk of binding increases. Use a riving knife to keep the kerf open. If the saw bogs down, do not force it—switch to a band saw to clear the larger volume of chips.
Band Saws (Best for Thick Stock & Curves)
The band saw is the safest tool for thick blocks (>1") and irregular shapes because the long blade dissipates heat better than a circular blade.
- Tooth Pitch is Critical: You need large gullets to carry the curled chip out of the kerf.
- Thick Stock: Use a 3-4 TPI (Teeth Per Inch) skip-tooth or hook-tooth blade.
- Thin Stock: Use a 6-8 TPI blade to prevent snagging.
- The "Re-Weld" Test: If the plastic heals itself behind the blade, your blade is dull, or your feed is too slow. Increase your feed rate or switch to a coarser blade.
Handheld Tools (Circular Saws, Jigsaws, Routers)
Hand tools work well for on-site fabrication if you follow one rule: Movement Prevents Melt.
- Circular Saws: Use a framing square or guide rail. Free-handing leads to binding, which instantly scorches the edge.
- Jigsaws:
- Blade: Use a fast-cutting wood blade (6-10 TPI). Avoid fine metal-cutting blades as they clog instantly. Set orbital action to Off or Low to prevent excessive vibration in flexible sheets.
- Action: Set orbital action to Off or Low. High orbital action causes excessive vibration in flexible sheets.
- Routers: For handheld work, ensure you have a stable template. If the bearing pauses on a rough spot, the bit will dig in and melt a divot.
Laser Cutting Limitations
While HDPE is not toxic in the same way that PVC is, it is a poor candidate for laser cutting:
- Poor Edge Quality: HDPE tends to melt and "puddle" rather than vaporize cleanly, resulting in a raised, waxy lip and a distorted edge.
- Fire Risk: Because it melts and drips, HDPE is flammable and can foul the laser bed or ignite if settings are not perfectly dialed.
- The Exception: Some industrial facilities with high-pressure nitrogen assist gas can laser cut thin HDPE, but for the vast majority of shops, it is highly discouraged or strictly prohibited.
CNC Machining HDPE: Feeds, Speeds & Tooling
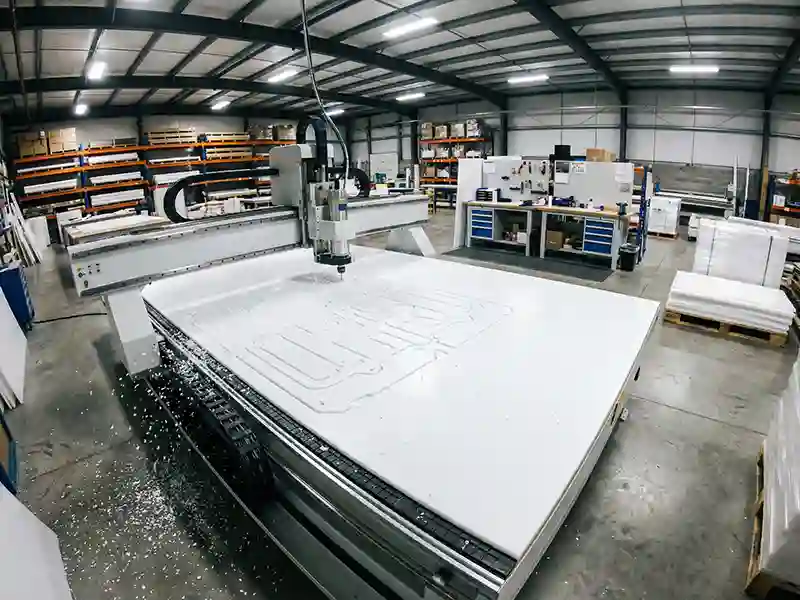 Most CNC failures in HDPE occur because operators treat it like aluminum. Metal-cutting end mills have too many flutes and not enough gullet space, causing chips to pack, melt, and re-weld to the cutter. To machine HDPE cleanly, you must prioritize chip evacuation above all else.
Tooling Selection: The "O-Flute" Standard
The industry standard for soft plastics is the Polished Single-Flute O-Flute.
- Why it works: The high helix angle and large, polished gullet allow the long, curly HDPE chip to eject instantly without friction.
- Why metal tools fail: A 4-flute end mill leaves no room for the chip. The plastic compresses inside the flutes, generates heat, and welds the bit shut in seconds.
Upcut vs. Downcut: Which to Choose?
| Geometry | Best For | The Trade-off |
|---|---|---|
| Upcut (Spiral Up) | Most Applications. Pulls chips up and out of the cut. Essential for slotting and deep pockets. | Can lift the material if vacuum hold-down is weak. May leave a slight burr on the top edge. |
| Downcut (Spiral Down) | Thin Sheet / Top Finish. Pushes chips down, keeping the material pressed against the table. Leaves a clean top edge. | Traps chips at the bottom. Risk of melting in slots or deep pockets. Use only for final profiling or shallow passes. |
Feeds & Speeds: The "Anti-Melt" Logic
With HDPE, your primary focus is managing heat. The control knob for heat is Chip Load (the thickness of the slice taken by each tooth).
Feed Rate (IPM) = RPM × Flutes × Chip Load
If the Chip Load is too low, the tool rubs against the material instead of cutting it. This friction generates excess heat, which instantly melts the plastic.
If the Chip Load is too high, the cutter exerts too much force. This can push the part off the table (workholding failure) or snap small tools.
Starting-Point Settings (Single-Flute O-Flute @ 18,000 RPM)
These values are conservative starting points. Push feed rate higher until finish degrades.
| Tool Diameter | Target Chip Load | Feed Rate @ 18k RPM | Max Depth of Cut |
|---|---|---|---|
| 1/8" (3mm) | 0.004" - 0.006" | 70 - 110 IPM | 1x Dia (0.125") |
| 1/4" (6mm) | 0.008" - 0.012" | 145 - 220 IPM | 1x Dia (0.25") |
| 3/8" (10mm) | 0.011" – 0.016" | 200 – 290 IPM | 1x Dia (0.375") |
| 1/2" (12mm) | 0.015" - 0.020" | 270 - 360 IPM | 1x Dia (0.50") |
| Depth of Cut: The standard rule is 1x Tool Diameter per pass. If you must cut deeper (e.g., 2x the diameter), you often need to reduce the chip load slightly to prevent tool deflection, but be careful not to slow down so much that you burn/melt the material. | |||
Toolpath Strategy
Your CAM software defaults are likely set for metal. Change them for HDPE:
- Ramp, Don't Plunge: Never plunge vertically into HDPE. The dwelling heat will melt a "blob" at the entry point. Use a Linear Ramp or Helical Entry to keep the tool moving while it enters.
- Avoid "Skim" Passes: A traditional "0.005-inch finishing pass" often fails in HDPE because the tool rubs more than it cuts. Leave at least 0.015" - 0.020" for a finishing pass so the tool has enough material to bite into.
- Maintain Motion: Ensure your machine doesn't dwell in corners. If the CNC slows down to negotiate a sharp 90° corner, the heat builds up. Radius your corners slightly to keep speed constant.
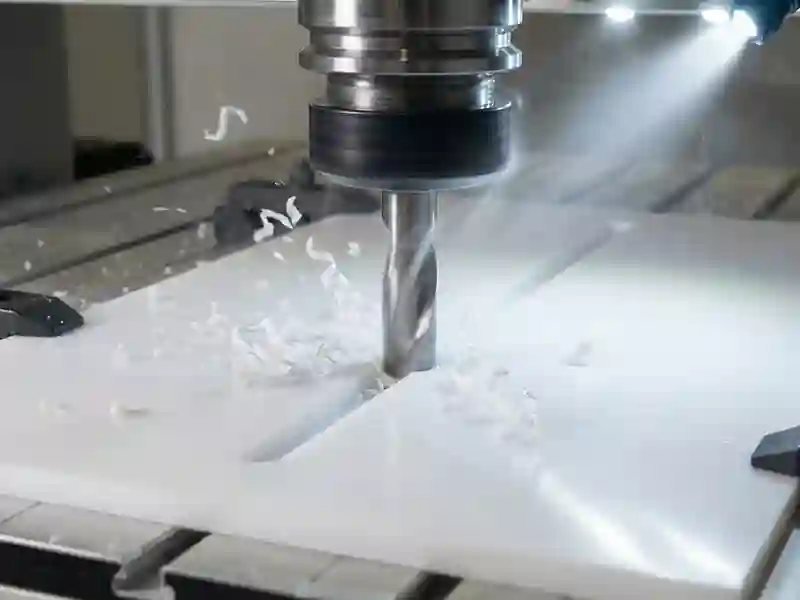
Drilling & Tapping HDPE: Preventing Wrap & Strip-Out
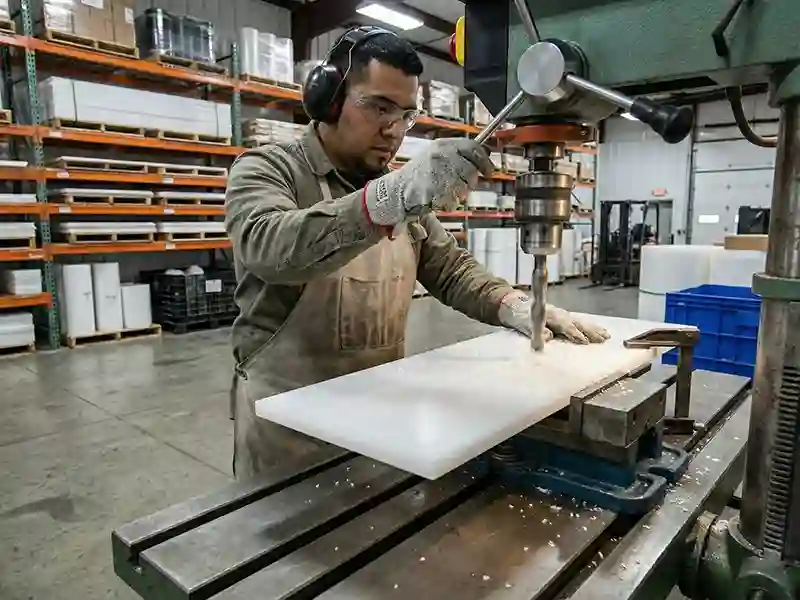 Drilling HDPE is deceptive: it is soft enough to drill fast, but tough enough to grab the bit and rip the material if the geometry is wrong.
Drilling: The "Grab" Risk
Standard metal bits (118° point, aggressive rake) act like a screw in HDPE. They tend to "grab" the material and pull themselves in faster than they can cut, which can crack the plastic or wrench the drill from your hands.
- The Fix: Use a plastic-specific drill bit (often called a "slow spiral" or "low helix" bit). While a sharper 90°–60° point angle can reduce the force needed to push through the material, modifying the rake is actually the most critical step to prevent the bit from grabbing. Many machinists prefer using a standard 118° or 120° point, but they dull the cutting edge slightly (a process called "dubbing"). This creates a 0° or negative rake, forcing the lip to scrape the hole rather than digging in and pulling the plastic up the flutes.
- Peck Drilling (The 3x Rule): For any hole deeper than 3x the diameter, you must use a "peck" cycle (drill a little, retract fully, drill again). HDPE creates a continuous ribbon chip. If you don't retract to break the chip, it will wrap around the bit, pack the flutes, and melt the hole walls.
- Preventing Breakout: Always clamp a sacrificial backup board (plywood or MDF) underneath the part. Without it, the drill will push a large, ugly burr out the bottom (exit side) rather than cutting cleanly.
Tapping & Threads: The "Strip-Out" Risk
HDPE threads are not as strong as metal threads. They are prone to stripping if over-torqued and creeping (loosening) over time under load.
- Use Coarse Threads Only: Always use UNC (Coarse) threads. Fine threads (UNF) have shallow roots that shear off easily in soft plastic.
- Threaded Inserts Are Best Practice: For parts that will be assembled and disassembled frequently, do not tap the plastic directly. Use Helical Inserts (Heli-Coil) or Ultrasonic/Heat-Set Inserts to provide permanent steel threads that won't strip.
- Coolant is Critical: Use an air blast or water mist when tapping. The friction from a tap is a massive heat source that can melt the threads as they are being cut.
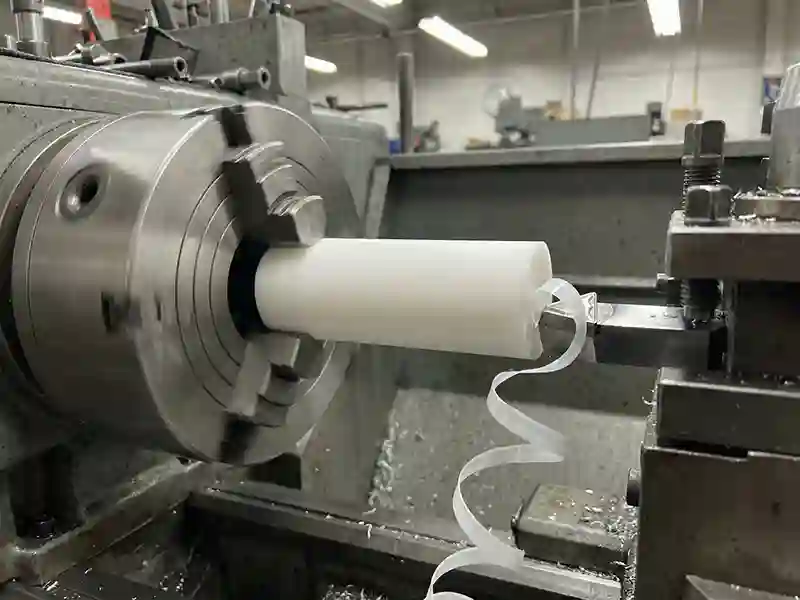
Turning HDPE Rod & Tube on a Lathe
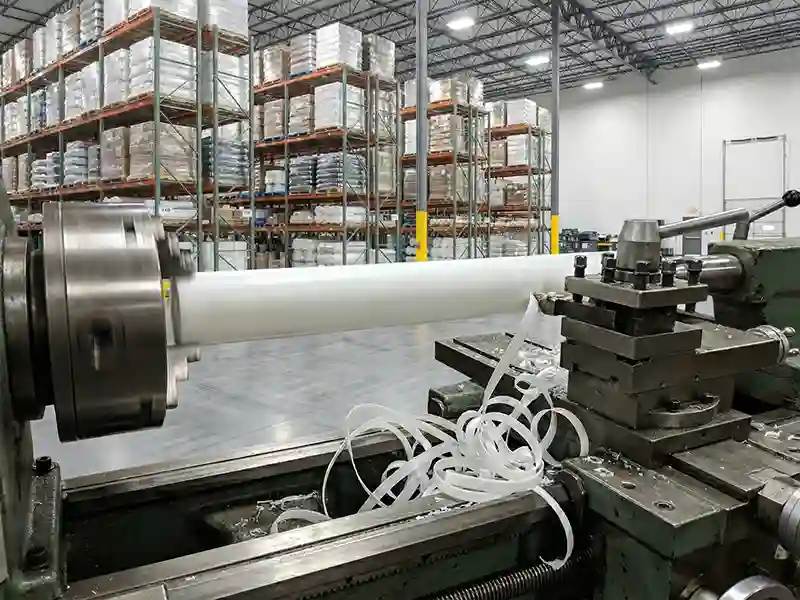 Turning HDPE is less about cutting force and more about chip management. Because the material is ductile, it produces continuous, stringy ribbons that can wrap around the chuck or the part (creating a dangerous "bird's nest") if not managed.
Tooling: Sharp & Polished
- Insert Selection: Use polished, high-positive rake inserts designed for Aluminum (e.g., CCGT or VCGT style). You need a razor-sharp edge to shear the plastic. "General Purpose" steel inserts (coated/honed) are too dull; they plough the material, generate heat, and leave a fuzzy finish.
- Chip Breakers: Standard chip breakers rarely work on HDPE because the plastic is too flexible to snap. Focus on chip evacuation (directing the stream away) rather than chip breaking.
Setup & Technique
- Limit Chuck Pressure: HDPE is soft. If you tighten a 3-jaw chuck too much, you will distort the part. When you remove it, the part will spring back to an "out-of-round" triangle shape. Use pie jaws (soft jaws) that wrap 360° around the part to distribute pressure evenly, or use a collet system.
- Center Support: If using a tailstock, use a live center with low pressure. High pressure will cause the center to melt into the end of the workpiece as it spins.
Speeds & Feeds
- Speed (RPM): You can run high RPMs (similar to aluminum), provided you keep the tool moving.
- Feed Rate: Be aggressive (0.010" - 0.020" per rev). A heavy feed creates a thicker, stiffer chip that is easier to eject and carries more heat away from the part. Light "skim cuts" (0.001") often just smear.
Bending & Forming HDPE: Managing Springback
 Unlike amorphous plastics (like Acrylic or Polycarbonate) that soften gradually, HDPE is a semi-crystalline material. This means it transitions sharply from solid to molten, making thermal forming trickier. It also has significant "memory," meaning it constantly fights to return to its original flat shape.
Cold Bending (The Safer Route)
HDPE is tough enough to be cold-formed into curves without heating, provided you respect the bend radius.
- Minimum Radius Rule: A general safe rule is 100x material thickness for long-term applications to prevent stress cracking. For example, a 0.25" sheet needs a radius of at least 25" (anything tighter risks cracking).
- Fastening: Cold-bent sheets are under constant tension. Use mechanical fasteners (bolts/washers) with oversized holes to hold the curve while allowing for thermal expansion.
Line Bending & Heat Forming
Heat bending requires precise temperature control. If you miss the window, the material either springs back (too cold) or overheats and collapses (loses all structural shape).
Target Temperatures by Grade:
- Standard HDPE (Commercial Sheet): 260°F - 280°F (127°C - 138°C). This is the sweet spot where the material becomes pliable without losing all structural strength.
- Marine Board (King Starboard® / UV Stabilized): 250°F - 270°F (121°C - 132°C). Be careful: overheating damages the textured surface finish, leaving shiny "burn" marks.
The "Over-Bend" Rule: Because HDPE has significant material memory, you must over-bend the angle by 3°-5° past your target to account for springback as the plastic cools.
Cooling is Key: You must fixture the part and hold it in the bent position until it is completely cool (room temperature). Releasing it while it is even slightly warm (100°F+ / 38°C+) will cause the part to warp back toward flat.
HDPE Finishing & Post-Processing: Achieving a Clean Edge
Because HDPE is soft and ductile, machined edges often retain a slight "fuzz" or burr. Getting a perfectly clean edge requires knowing which thermal techniques to avoid and which mechanical approach to use.
Deburring & Edge Finishing
- For High Production: The fastest and most consistent way to finish an edge is a secondary pass with a router (chamfer or roundover bit). This physically shears the burr away, leaving a clean, safe profile.
- For Hand-Finishing: Use a swivel-blade deburring tool or a rigid card scraper. HDPE peels beautifully under a sharp scraper.
- Sanding: Use caution. Light hand-sanding with fine grit can remove fuzz, but power sanding generates friction heat quickly, which will simply smear the plastic and make the edge look worse.
The Flame Polishing Myth
A common mistake is attempting to "flame polish" the edge of HDPE with a torch, expecting it to turn smooth like with acrylic. This does not work. Because HDPE is a semi-crystalline plastic, the flame will melt the surface into a cloudy, waxy puddle, distorting the edge and potentially causing the material to catch fire.
Edge Quality Decision Chart
If you are trying to achieve a specific look, use this framework to set expectations and choose your method:
| Desired Edge Quality | Recommended Method | The Reality |
|---|---|---|
| Standard / Matte | Conventional Machining | A properly dialed-in CNC pass with a sharp O-flute bit leaves a clean, matte finish directly off the machine. |
| Safe / "Hand-Friendly" | Router Chamfer or Roundover | Removes sharp corners and cutting burrs. Ideal for handles, marine parts, and safety guards. |
| Smooth / Flawless | Hand Scraping | Peeling the edge with a rigid metal scraper leaves the smoothest possible finish without generating heat. |
| Glossy / Optically Clear | Not Possible with HDPE | If your application requires a glass-like polished edge, you must switch to a different material (e.g., Acrylic or Polycarbonate). |
How to Join HDPE: Welding, Fastening & Adhesives
HDPE is a "Low Surface Energy" (LSE) plastic. In practical terms, this means standard glues, epoxies, and tapes simply will not stick to it. You must rely on mechanical fastening, welding, or highly specialized structural adhesives.
Mechanical Fastening (The Most Reliable Method)
 Because HDPE expands and contracts significantly with temperature changes, your fastening strategy must allow the material to "breathe" without buckling.
- Oversize the Holes: Always drill clearance holes slightly larger than the screw shank. If you lock the sheet down rigidly, it will warp as the temperature rises.
- Distribute the Load: Use oversized washers or grommets. Because the plastic is soft, point loads from small screw heads will eventually pull through or dish the material.
- Dynamic Joints: For doors, hinges, lids, or anything that moves, use threaded metal inserts (as covered in the Drilling & Tapping section). Screwing directly into the plastic for a dynamic joint will eventually result in stripped threads.
Plastic Welding (The Permanent Solution)
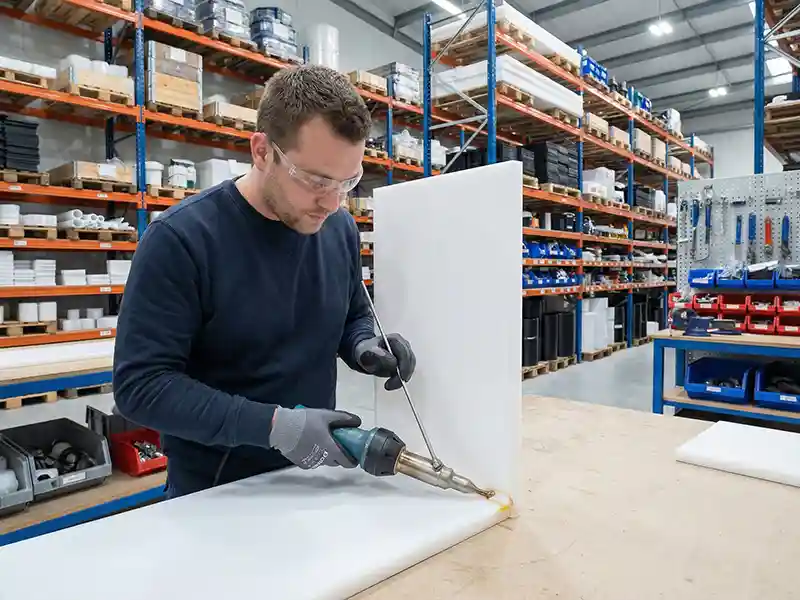 Welding fuses two pieces of HDPE together using heat and a filler rod of the exact same grade. Do not try to weld standard HDPE to UHMW or Marine Board, as the melt flow indexes will not match. Because one plastic will melt while the other remains rigid, you will not get molecular fusion. The filler rod will sit on the surface like cheap hot glue and easily peel or snap apart under minimal stress.
Which Welding Method?
| Method | Best For | How It Works |
|---|---|---|
| Hot-Air Welding (e.g., Leister Triac) | Thin sheet (< 1/2"), light repairs, tight corners. | Hot-air welding, also called hot-gas welding, uses a specialized hot-air hand tool and a speed tip to melt a thin plastic filler rod directly into a V-groove joint. |
| Extrusion Welding (e.g., Leister Fusion) | Thick plate (> 1/2"), structural tanks, heavy fabrication. | A hand extruder machine pumps a thick bead of molten plastic directly into the joint, creating massive structural strength. |
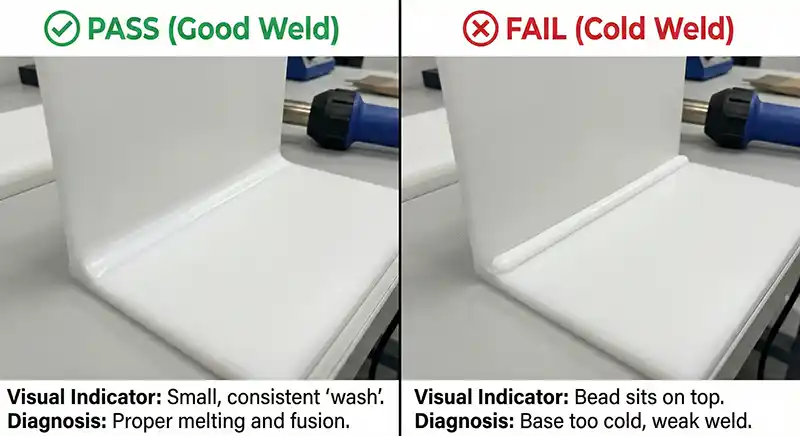
Bead Inspection (The Quality Check):
| Weld Quality | Visual Indicator | Diagnosis & Meaning |
|---|---|---|
| ✅ Pass (Good Weld) | A small, consistent "wash" (a tiny ridge of melted material) along both edges. | The base material melted properly and fused with the rod. |
| ❌ Fail (Cold Weld) | The bead sits perfectly on top of the groove like a piece of string. | The base material was too cold. The weld will snap off under pressure. |
| ❌ Fail (Scorched) | The plastic is discolored, bubbling, or warped. | The heat was too high, chemically degrading the polymer. |
Adhesive Options
Standard shop glues, epoxies, superglues, and construction adhesives will fail on HDPE. If you must use an adhesive, you need a specialized structural acrylic adhesive designed specifically for Low Surface Energy (LSE) plastics.
3M™ Scotch-Weld™ DP8005 is engineered specifically to bond polyethylene without requiring open-flame surface treatments or chemical etching. However, bond strength varies wildly based on surface finish, environmental temperature, and joint design. Always run physical pull tests on your specific grade of HDPE before trusting an adhesive joint in a structural application.
Designing for HDPE: Dimensional Stability & Tolerances
Plastics are not metals. If an engineer applies metal practices to an HDPE print and expects it to hold a ± 0.001" tolerance across a 100°F temperature swing, the part will fail, and the fabricator will face avoidable rejects.
Thermal Expansion: Plan for Movement
HDPE expands and contracts significantly with temperature changes. You must calculate this movement before drilling your mounting holes. While you should always consult your specific material's datasheet, a common Coefficient of Linear Thermal Expansion (CLTE) for HDPE is 0.0001 in/in/°F.
Thermal Expansion Formula:
ΔL = L × CLTE × ΔT
(Change in Length = Original Length × CLTE × Change in Temperature)
A Real-World Example:
Imagine you are installing a 48-inch HDPE panel outdoors. It is installed in the winter at 30°F, and the summer sun will heat the panel to 100°F (a 70°F swing).
L = 48"
CLTE = 0.0001
ΔT = 70°F
Calculation: 48 × 0.0001 × 70 = 0.336 inches
That 48-inch panel will grow by more than 5/16 of an inch. If it is hard-bolted to a steel frame, it will buckle and warp. Always use slotted holes or oversized clearance holes.
Tolerances & Machining Best Practices
- Balance Your Cuts: Extruded HDPE has internal skin stress. If you mill 0.250" off the top of a sheet and nothing off the bottom, the stress imbalance will cause the part to bow (often called "potato chipping"). Always try to machine both sides evenly.
- Inspect at Room Temp: Measuring a part while it is still warm straight off the CNC machine will give you a false reading. HDPE will shrink as it cools. Always inspect at a controlled room temperature.
Annealing HDPE: The Fix for Warped Parts
If you must machine deep pockets or remove significant material from one side of a sheet, you will release those locked-in extrusion stresses. Annealing is the process of heating and cooling the plastic to let the polymer chains relax before final machining.
When to Anneal:
- Before Machining: For critical tolerance parts, purchase HDPE sheet that has been factory stress-relieved, or anneal the blank stock yourself before cutting.
- The Rough & Finish Method: Machine the part to within 0.030" - 0.060" of the final dimension, anneal it to release the stress, and then run your final finishing passes.
The Annealing Cycle (A General Guideline for HDPE):
- Heat: Ramp up slowly to ~225°F (107°C) (check your specific datasheet to ensure you don't exceed the softening point).
- Soak: Hold at temperature for 1 hour per inch of thickness.
- Cool: This is a critical step. Cool excessively slowly (often less than 20°F per hour) until the part reaches room temperature. If you pull it out of the oven hot and let it cool rapidly, you will reintroduce the stress and defeat the entire process.
Troubleshooting Common HDPE Machining Defects
Use this like a shop-floor checklist: if you see a defect, find the symptom below to identify the root cause and the immediate fix.
| What You See (Symptom) | Likely Cause | Fixes to Try First |
|---|---|---|
| Glossy/smeared edge, melted "re-weld" | Rubbing / chip load too low; chips trapped in the cut. | Increase feed rate, reduce RPM, switch to an O-flute/large gullet bit, and add air blast/vacuum to clear chips. |
| White fuzz/hair on edge | Dull tool; wrong cutting geometry; taking too light of a finishing pass. | Sharpen/replace the bit, change bit geometry, increase chip load slightly, or adjust your cut direction (climb vs. conventional). |
| Chatter/wavy walls | Poor workholding; too much tool stick-out; flexible sheet vibrating. | Improve fixturing/support, reduce tool stick-out to the bare minimum, or change toolpath engagement. |
| Part cups/bows after unclamping ("Potato Chipping") | Stress imbalance; thermal effects; uneven machining; over-tight clamping. | Machine both sides evenly, use factory stress-relieved sheet, reduce clamping distortion, or utilize the rough & finish method with an annealing cycle. |
| Drill "grabs" / screws itself in | Drill rake/point geometry is too aggressive; chip packing in the flutes. | Modify the drill bit to a 0° to negative rake (dub the lip), peck drill to clear chips, and adjust the point angle. |
| Ugly hole exit / breakout | No backup board underneath the part; heat + chip buildup pushing through. | Firmly back up the exit side with scrap material, peck and clear chips, and slow down your plunge rate (but only if you're still actively cutting a chip to avoid melting). |
Should You Outsource Your HDPE Fabrication?
 Machining HDPE requires specific tooling to cleanly cut its soft surface, aggressive chip collection to manage its high ductility (stringy chips), and specialized workholding to handle its flexibility. If a shop is primarily set up for metals or wood, running a high-volume plastic job can heavily disrupt the normal workflow.
In these cases, it is often more cost-effective to buy cut-to-size blanks or fabrication services from Interstate Plastics, or to outsource the finished fabrication to a specialized local machine shop, rather than tooling up internally from scratch.
Consider buying pre-cut blanks or outsourcing your HDPE fabrication if the project requires:
- High Part Counts: where the time spent clearing static-charged chips and managing thermal expansion eats into profit margins.
- Complex 3D Geometries: which require specialized CNC routing and custom vacuum workholding (since magnetic chucks don't work on plastic).
- Tight Repeatability: where environmental temperature swings might cause dimensional drift across a long production run.
- Ready-to-Run Blanks: Buying pre-cut, squared blanks allows a machine shop to skip the heavy roughing passes and go straight to finish-machining, saving immense machine time and reducing wear on tooling.
Skip the hassle: Whether you are a local machine shop looking to speed up production with precision cut-to-size blanks, or a manufacturer needing full CNC routing services, the Interstate Plastics fabrication team can help. Get a quote today.
HDPE Cleaning & Chemical Compatibility
One of HDPE's primary selling points is its extreme chemical resistance. Unlike polycarbonate (which crazes when exposed to solvents) or acrylic (which can shatter or crack with alcohol), HDPE is chemically inert to the vast majority of common shop fluids.
Safe Cleaners & Solvents
- Isopropyl Alcohol (IPA):
- Highly effective and completely safe for degreasing and wiping away surface oils before fabrication.
- Standard Detergents:
- Mild soaps and water are perfect for general dirt and shop dust.
- Industrial Chemicals:
- HDPE safely handles most acids, alcohols, and bases that would quickly destroy other clear or engineering plastics.
What to Avoid
While HDPE is highly resistant, it is not invincible.
- Strong Oxidizing Agents:
- High-concentration acids (such as pure nitric or sulfuric acid) can degrade and embrittle the surface over time.
- Aromatic Hydrocarbons:
- Prolonged exposure to chemicals like toluene or xylene can cause the plastic to swell and soften, even if it doesn't dissolve it outright.
- Stress Cracking Agents (ESC):
- Certain detergents or surfactants, when combined with high physical tension (such as a tightly bolted cold bend), can trigger Environmental Stress Cracking (ESC). If the part is installed under high mechanical stress, always rinse cleaners off thoroughly to prevent premature failure.
This guide was authored by Christopher Isar and reviewed for technical accuracy by Chris Clark.

About the Author
At Interstate Advanced Materials, Christopher Isar turns "it depends" into "do this." Since 2011, he's helped buyers choose plastics with confidence by focusing on what works on the shop floor and in the field, backed by IAPD Level 2 certification. If your project can't miss, Chris will guide you to cost-effective, real-world options. Contact Chris.